Jen wasn’t trying to impress anyone. I’d stopped by her place to borrow a pastry blender—mine had given up mid-batch of pie crust—and the smell hit me before I’d even knocked. That specific, buttery-toasty scent that means someone, somewhere, is doing something right. She opened the door with flour on her chin and said, “Oh, I’m just testing something for the kids’ lunchboxes.” Just testing. Like what she’d pulled out of the oven was no big deal. But sitting on her counter was a single tray of maybe eight cookies, and they looked… perfect. Golden at the edges, soft in the middle, the kind of cookie that makes you forget why you came over in the first place. She handed me one, still warm, and honestly? I almost dropped it because I was so focused on taking that first bite. The edge crunched, the center gave way like a hug, and I think I said something embarrassing like, “You have to write this down.” She just shrugged and told me the trick—a tiny bit more brown sugar than white, a rest in the fridge, and most importantly, only baking a few at a time so they don’t overcrowd the pan. That was two years ago, and I’ve never made a batch of chocolate chip cookies the same way since. Maybe you’ve been there—standing in someone’s kitchen, watching them be casually brilliant—and you just know you’re going to steal that recipe forever.
Why You’ll Love This Recipe
Look, I’ve tested a lot of cookie recipes. Some are too cakey, some spread into flat puddles, and some just don’t deliver that perfect contrast of crispy and gooey. After years of tweaking and burning more than a few trays, this small-batch version is the one I keep coming back to. Here’s why it works:
- Quick & Easy: From mixing bowl to cooling rack in about 30 minutes. No complicated techniques, no special equipment.
- Simple Ingredients: You probably have everything in your pantry right now. Butter, sugar, an egg, flour, chocolate chips. That’s it.
- Perfect for Hosting: When you’re having people over, the last thing you need is a huge batch of cookies going stale. This recipe makes exactly 8 to 10 cookies—enough for a dessert table without leftovers haunting you for days.
- Crowd-Pleaser: I’ve brought these to potlucks, dinner parties, and casual get-togethers, and they disappear every single time. Kids and adults fight over the ones with the most visible chocolate.
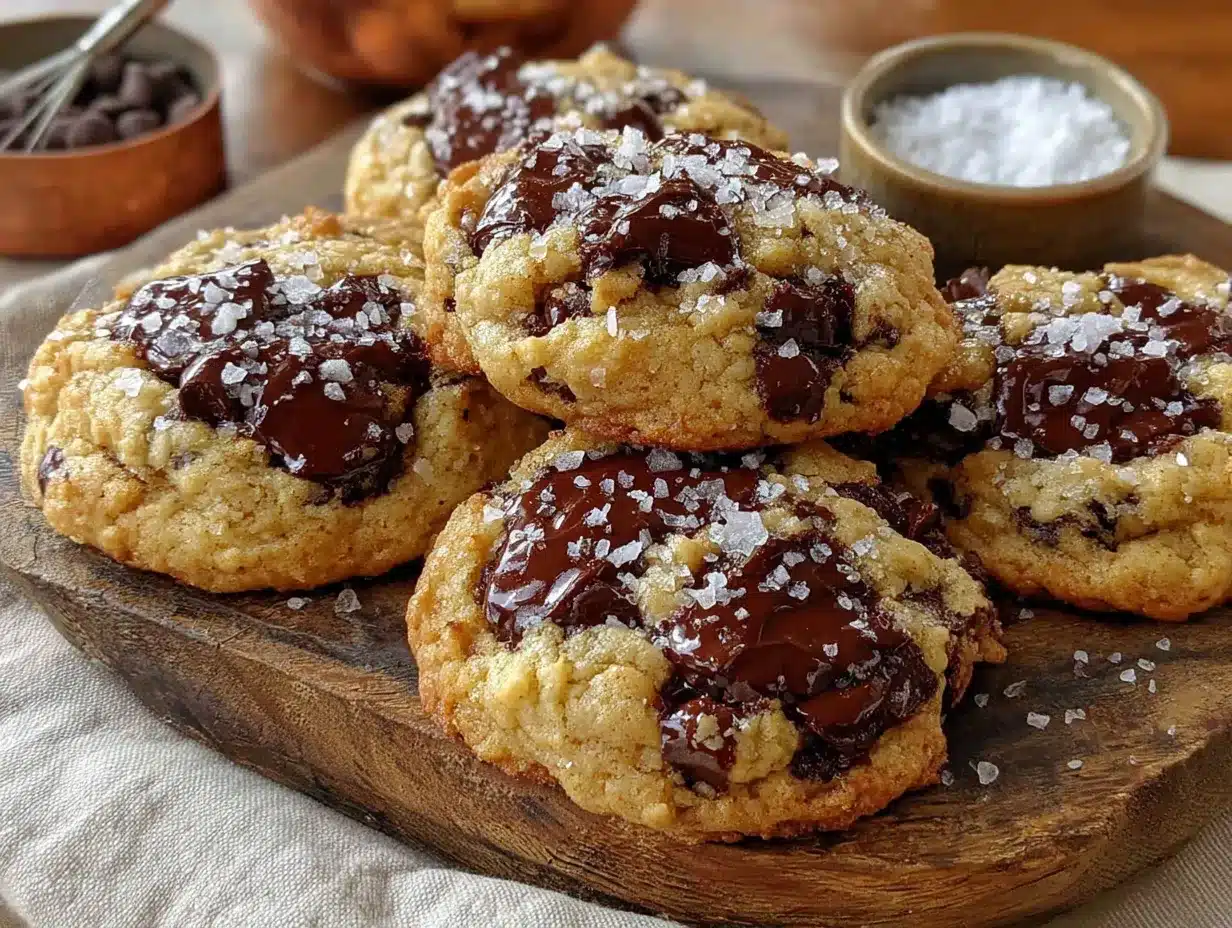
- Unbelievably Delicious: That first bite is a moment. The edge shatters, the center stays soft, and the saltiness of the butter balances the sweetness perfectly. It’s the kind of cookie that makes you close your eyes for a second.
What makes this different from every other chocolate chip cookie recipe out there? It’s the ratio. I use a higher proportion of brown sugar to white, which gives you that chewy texture and deeper flavor. Plus, the small batch means you’re not tempted to crowd the baking sheet, which is the number one reason cookies turn out flat and sad. This recipe is my best version—tested, approved, and shared with anyone who asks.
What Ingredients You Will Need
This recipe calls for simple, pantry-friendly ingredients that work together to create that perfect texture. No weird extracts or obscure flours—just the basics, done right.
- Unsalted butter, softened: 4 tablespoons (57g). I always use unsalted so I can control the salt level. Let it sit out for about 30 minutes before you start—you want it soft but not melted. Land O’Lakes is my go-to brand for consistent quality.
- Granulated sugar: 2 tablespoons (25g). This gives the cookies a bit of crunch on the edges.
- Light brown sugar, packed: 3 tablespoons (40g). The star of the show. Pack it firmly into your measuring spoon—it makes a difference. The molasses in brown sugar adds moisture and that deep, caramel-like flavor.
- Large egg yolk: 1 yolk (about 18g). Save the white for an omelet or scramble. The yolk adds richness and helps bind the dough without making it too wet.
- Vanilla extract: ½ teaspoon. Pure vanilla is worth the splurge here. Imitation will work, but you’ll taste the difference.
- All-purpose flour: ⅓ cup plus 1 tablespoon (55g). Spoon and level it—don’t scoop directly from the bag or you’ll pack in too much flour and end up with dry cookies.
- Baking soda: ¼ teaspoon. This helps the cookies spread just enough.
- Salt: ¼ teaspoon plus a tiny pinch for the top. I use fine sea salt for the dough and flaky sea salt for finishing. Maldon is my favorite for that last sprinkle.
- Chocolate chips or chopped chocolate: ⅓ cup (60g). Go with what you love. I’m partial to Ghirardelli 60% cacao chips, but chopped semisweet chocolate bars give you those beautiful pools of chocolate. For a party, I’ll sometimes mix dark and milk chocolate chips for variety.
Ingredient selection tip: If your butter is too cold, the dough won’t cream properly. If it’s too warm, the cookies will spread too much. Aim for that Goldilocks zone—soft to the touch but still holding its shape.
Substitution guidance: You can swap the all-purpose flour with a gluten-free 1:1 blend (like Bob’s Red Mill) for a gluten-free version. Use coconut oil instead of butter for a dairy-free option, though the texture will be a bit different—more crisp, less chewy. And if you’re out of brown sugar, mix 3 tablespoons of granulated sugar with 1 teaspoon of molasses. It’s not quite the same, but it works in a pinch.
Equipment Needed
You don’t need a fancy kitchen to pull this off. Here’s what I use:
- Mixing bowls: One medium bowl for the dry ingredients, one small bowl for the wet. Any bowl works, but I love my Pyrex glass bowls because they’re easy to clean and don’t hold onto smells.
- Hand mixer or stand mixer: A hand mixer is perfect for creaming the butter and sugar. You can do it by hand with a wooden spoon, but you’ll need some elbow grease. I use a KitchenAid hand mixer—it’s lasted me years.
- Rubber spatula: For scraping down the sides and folding in the chocolate chips. A silicone one is best because it won’t scratch your bowls.
- Baking sheet: A light-colored, rimmed baking sheet works best. Dark sheets can cause the bottoms to burn before the edges are done. I use a Nordic Ware sheet—it’s sturdy and heats evenly.
- Parchment paper or silicone baking mat: Parchment paper is cheap and makes cleanup a breeze. A Silpat mat works too, but I find parchment gives slightly crispier edges.
- Cookie scoop or tablespoon: For portioning the dough evenly. A 1.5-tablespoon scoop is my favorite size for these cookies.
- Cooling rack: Lets air circulate around the cookies so they stay crisp on the outside. If you don’t have one, transfer the cookies to a plate after a few minutes.
Budget-friendly tip: If you don’t have a cookie scoop, just use two spoons to drop the dough. It’s not as neat, but the cookies will taste the same.
Preparation Method
- Preheat your oven to 350°F (175°C). Line a baking sheet with parchment paper. This is important—don’t skip the parchment. It prevents sticking and helps the cookies spread evenly.
- Cream the butter and sugars. In a medium bowl, combine 4 tablespoons softened butter, 2 tablespoons granulated sugar, and 3 tablespoons packed light brown sugar. Beat with a hand mixer on medium speed for about 2 minutes, until the mixture is light and fluffy. You’ll see it change color—it gets paler and looks almost like frosting. Scrape down the sides of the bowl with your spatula. This step is crucial because it incorporates air, which gives the cookies their lift.
- Add the egg yolk and vanilla. Drop in 1 large egg yolk and ½ teaspoon vanilla extract. Beat on low speed until just combined—about 15 seconds. Don’t overmix here, or the cookies can get tough. The mixture might look a little curdled at this point; that’s totally normal.
- Whisk the dry ingredients. In a small bowl, whisk together ⅓ cup plus 1 tablespoon all-purpose flour, ¼ teaspoon baking soda, and ¼ teaspoon salt. Whisking ensures the baking soda and salt are evenly distributed—no one wants a pocket of salt in their cookie.
- Combine wet and dry. Add the flour mixture to the butter mixture. Mix on low speed until just barely combined—you should still see a few streaks of flour. Add ⅓ cup chocolate chips and fold them in with your spatula. Stop as soon as the flour disappears. Overmixing develops gluten, which makes cookies tough.
- Chill the dough (optional but recommended). If you have time, cover the bowl and pop it in the fridge for 20 to 30 minutes. Chilling solidifies the butter, which means less spreading in the oven and thicker cookies. If you’re in a hurry, you can skip this step—the cookies will just be a little flatter.
- Portion the dough. Use a 1.5-tablespoon cookie scoop to portion the dough into 8 to 10 balls. Place them on the prepared baking sheet, spacing them about 2 inches apart. These cookies spread, so give them room to breathe. If you’re making them for a party, you can arrange them symmetrically for a prettier presentation.
- Bake. Bake for 9 to 11 minutes, rotating the pan halfway through. At 9 minutes, the edges will be golden and set, but the centers will still look slightly underdone and puffy. That’s exactly what you want. For crispier edges, go to 11 minutes. My personal sweet spot is 10 minutes—the edges are perfectly crisp and the centers are still soft.
- Cool on the pan. Let the cookies rest on the baking sheet for 5 minutes. They’ll continue cooking from the residual heat, setting the centers without drying them out. After 5 minutes, transfer them to a wire rack to cool completely. If you try to move them too soon, they’ll fall apart.
- Finish with salt. While the cookies are still warm, sprinkle a tiny pinch of flaky sea salt over the tops. This isn’t just for looks—the salt cuts through the sweetness and makes the chocolate flavor pop. It’s the kind of detail that makes people ask, “What did you do differently?”
Cooking Tips & Techniques
I’ve made more bad batches of cookies than I care to admit. Here’s what I’ve learned the hard way so you don’t have to.
Don’t overmix the dough. This is the number one mistake I see. Once you add the flour, mix just until it disappears. Overmixing develops gluten, which gives you tough, bread-like cookies instead of tender ones. I speak from experience—I once mixed for a full minute because I got distracted by a phone call, and those cookies were dense enough to use as hockey pucks.
Use room temperature ingredients. Cold butter won’t cream properly, and cold egg yolk can seize the mixture. Let your butter and egg sit out for 30 minutes before you start. If you forgot to plan ahead, cut the butter into small cubes and let it sit for 10 minutes—it’ll soften faster.
Weigh your flour if you can. I know, I know, it sounds fussy. But flour is tricky—scooping it can give you 20% more than you need. A kitchen scale is a game-changer for consistent results. If you don’t have one, use the spoon-and-level method: fluff the flour with a spoon, spoon it into your measuring cup, and level it off with a knife. Don’t pack it down.
Bake one sheet at a time. If you try to bake two sheets at once, the heat won’t circulate properly, and your cookies will bake unevenly. Stick to one sheet in the center rack. If you’re making a double batch, just bake in batches—it takes a little longer, but the results are worth it.
Watch the timer, not the oven light. Opening the oven door too often lets out heat and can mess with your bake. Use the oven light and window to check progress. I set a timer for 8 minutes, then start checking through the window every 30 seconds after that.
Variations & Adaptations
This recipe is a great base for experimenting. Here are some twists I’ve tried and loved:
- Double Chocolate Chip: Swap 1 tablespoon of flour for 1 tablespoon of unsweetened cocoa powder. Use white chocolate chips and dark chocolate chips together. The contrast is stunning on a dessert table.
- Nuts & Sea Salt: Add ¼ cup of toasted, chopped pecans or walnuts along with the chocolate chips. Toast them in a dry pan for 3 minutes first—it brings out their flavor. Top with extra flaky salt before baking.
- Gluten-Free Version: Replace the all-purpose flour with a 1:1 gluten-free baking blend (I like Bob’s Red Mill). Add 1 tablespoon of milk or water if the dough seems too dry. The texture will be slightly more delicate, but they’re still delicious.
- Vegan Option: Use 4 tablespoons of vegan butter (Miyoko’s is my favorite), 1 tablespoon of ground flaxseed mixed with 2.5 tablespoons of water (let it sit for 5 minutes to gel), and dairy-free chocolate chips. The cookies will be a bit flatter, but the flavor is still there.
- Brown Butter Version: Brown the 4 tablespoons of butter in a small saucepan over medium heat until it turns golden and smells nutty, about 3 minutes. Let it cool for 10 minutes before using. This adds a deep, toasty flavor that’s incredible for fall gatherings.
For a festive party, I’ll sometimes press a few extra chocolate chips onto the tops of the dough balls before baking. It makes the cookies look bakery-perfect and ensures every bite has chocolate.
Serving & Storage Suggestions
These cookies are best served warm, about 5 to 10 minutes after they come out of the oven. The edges are still crisp, the centers are soft, and the chocolate is melted but not runny. For a dinner party, I like to arrange them on a wooden board with a small bowl of flaky salt and a stack of napkins—it looks intentional and inviting.
They pair beautifully with a cold glass of milk, a strong cup of coffee, or even a scoop of vanilla ice cream sandwiched between two cookies. If you’re serving them at a potluck, bring a few extra in a sealed container—people will ask for seconds.
Storage: Store leftover cookies in an airtight container at room temperature for up to 3 days. They’ll lose a bit of their crispness, but they’ll still be delicious. To revive them, pop one in a 300°F oven for 3 minutes—it brings back the crispy edges.
Freezing: You can freeze the baked cookies for up to 2 months. Wrap them individually in plastic wrap, then place them in a freezer bag. Thaw at room temperature for 10 minutes. Or freeze the dough balls on a baking sheet, then transfer them to a freezer bag. Bake from frozen—just add 2 minutes to the baking time.
Make-ahead tip for hosting: Prepare the dough up to 24 hours in advance and keep it covered in the fridge. When your guests arrive, scoop and bake. The smell of fresh cookies will make everyone feel welcome.
Nutritional Information & Benefits
Per cookie (based on 10 cookies): approximately 180 calories, 10g fat, 22g carbohydrates, 2g protein, 12g sugar, 1g fiber. These are estimates—actual values depend on your specific ingredients.
While these aren’t health food, they’re made with real ingredients: butter, flour, and chocolate. The small batch size means you’re less likely to overindulge compared to a full recipe. Plus, dark chocolate contains antioxidants, and the butter provides a small amount of vitamin A. I like to think of them as a treat that’s worth every bite—not something to feel guilty about.
For dietary considerations: This recipe contains gluten, dairy, and eggs. For gluten-free or vegan adaptations, see the variations section above. If you’re watching your sugar intake, you can reduce the granulated sugar to 1 tablespoon, but the texture will be slightly less crisp.
Conclusion
This small-batch chocolate chip cookie recipe is the one I turn to when I want something special without the fuss. It’s quick, reliable, and delivers that perfect contrast of crispy edges and gooey centers every single time. Whether you’re hosting a dinner party, bringing a dish to a potluck, or just treating yourself on a quiet evening, these cookies never disappoint.
I love that this recipe feels like a secret weapon—simple enough to make on a whim, but impressive enough to steal the show. The brown sugar gives it depth, the chilling step adds texture, and that final sprinkle of salt makes it unforgettable. Try it once, and I think you’ll find yourself coming back to it again and again.
Have you made these cookies? I’d love to hear how they turned out. Leave a comment below with your favorite variation, or share a photo of your batch on Pinterest. And if you’re looking for more hosting-friendly desserts, check out my recipe for no-bake cheesecake bites or these lemon bars with shortbread crust. Happy baking, friends!
Frequently Asked Questions
Can I double this recipe?
Absolutely. Just double all the ingredients and follow the same steps. The baking time stays the same—just make sure you’re only baking one sheet at a time for even results.
Why did my cookies turn out flat?
Flat cookies usually mean the butter was too warm or the dough wasn’t chilled. Next time, chill the dough for at least 20 minutes before baking. Also, make sure your baking soda is fresh—old baking soda loses its power.
Can I use margarine instead of butter?
You can, but the texture will be different. Margarine has more water than butter, which can make cookies spread more and turn out less crispy. I recommend sticking with butter for the best results.
How do I get perfectly round cookies?
Right after the cookies come out of the oven, use a round cookie cutter or a glass to gently scoot the edges inward. It’s a bakery trick that works like a charm.
Can I make these cookies without a mixer?
Yes! Use a wooden spoon and some elbow grease. Cream the butter and sugar together until smooth—it might take 3 to 4 minutes of vigorous stirring. The rest of the steps are the same.
Pin This Recipe!

Best Small-Batch Chocolate Chip Cookies with Crispy Edges

These small-batch chocolate chip cookies deliver perfectly crispy edges and soft, gooey centers. Made with simple pantry ingredients and ready in about 30 minutes, this recipe yields 8 to 10 cookies—ideal for hosting or a quick treat.
- Prep Time: 15 minutes
- Cook Time: 10 minutes
- Total Time: 30 minutes
- Yield: 8-10 cookies 1x
- Category: Dessert
- Cuisine: American
Ingredients
- 4 tablespoons (57g) unsalted butter, softened
- 2 tablespoons (25g) granulated sugar
- 3 tablespoons (40g) light brown sugar, packed
- 1 large egg yolk (about 18g)
- ½ teaspoon vanilla extract
- ⅓ cup plus 1 tablespoon (55g) all-purpose flour
- ¼ teaspoon baking soda
- ¼ teaspoon fine sea salt, plus a tiny pinch for the top
- ⅓ cup (60g) chocolate chips or chopped chocolate
Instructions
- Preheat your oven to 350°F (175°C). Line a baking sheet with parchment paper.
- In a medium bowl, cream together 4 tablespoons softened butter, 2 tablespoons granulated sugar, and 3 tablespoons packed light brown sugar with a hand mixer on medium speed for about 2 minutes, until light and fluffy. Scrape down the sides.
- Add 1 large egg yolk and ½ teaspoon vanilla extract. Beat on low speed until just combined, about 15 seconds.
- In a small bowl, whisk together ⅓ cup plus 1 tablespoon all-purpose flour, ¼ teaspoon baking soda, and ¼ teaspoon salt.
- Add the flour mixture to the butter mixture. Mix on low speed until just barely combined, with a few streaks of flour remaining. Fold in ⅓ cup chocolate chips with a rubber spatula until just incorporated.
- Chill the dough in the refrigerator for 20 to 30 minutes if time allows (optional but recommended for thicker cookies).
- Using a 1.5-tablespoon cookie scoop, portion the dough into 8 to 10 balls. Place them on the prepared baking sheet, spacing about 2 inches apart.
- Bake for 9 to 11 minutes, rotating the pan halfway through. The edges should be golden and set, while the centers look slightly underdone and puffy.
- Let the cookies rest on the baking sheet for 5 minutes, then transfer to a wire rack to cool completely.
- While still warm, sprinkle a tiny pinch of flaky sea salt over the tops.
Notes
Chilling the dough for 20-30 minutes is optional but recommended for thicker cookies. For crispier edges, bake for 11 minutes. Use a kitchen scale for accurate flour measurement if possible. Store in an airtight container at room temperature for up to 3 days; reheat in a 300°F oven for 3 minutes to revive crispness.
Nutrition
- Serving Size: 1 cookie
- Calories: 180
- Sugar: 12
- Sodium: 120
- Fat: 10
- Saturated Fat: 6
- Carbohydrates: 22
- Fiber: 1
- Protein: 2
Keywords: small-batch chocolate chip cookies, crispy edges, soft center, easy cookie recipe, homemade cookies, dessert for hosting


