“You know, it started as a last-minute scramble the night before St. Patrick’s Day,” I remember saying to myself, staring at an empty cookie jar. Honestly, I wasn’t even sure if I had the patience for fancy decorating, but something about the idea of shamrock-shaped sugar cookies covered in shiny royal icing just felt… right. It wasn’t a grand plan, more like a hopeful experiment after a long day of chasing deadlines.
So I pulled out my trusty cookie cutters, dusted off my mixing bowls, and got to work. The kitchen filled with that unmistakable sweet vanilla scent—comforting and familiar. As the cookies baked, I realized this wasn’t just about making treats; it was a small way to slow down, celebrate the moment, and bring a little cheer to an otherwise chaotic week.
After that first batch, something clicked. The crisp edges, the tender crumb, and that glossy royal icing that sets just right—it all came together better than I expected. Since then, these Perfect Shamrock Sugar Cookies with Royal Icing have become a bit of an obsession every March. And honestly? They’re the kind of treat that makes you smile without fuss, perfect for sharing or sneaking a few before anyone notices.
That simple, joyful moment in the kitchen stuck with me. These cookies aren’t just about the flavor or the pretty green icing—they’re about making a little magic when you least expect it.
Why You’ll Love This Recipe
Over the years, I’ve tweaked this shamrock sugar cookie recipe to land that balance between soft and crisp, with royal icing that’s smooth, shiny, and easy to work with—even if you’re not a pro decorator. Honestly, it’s one of those recipes that feels like a treat to make and to eat.
- Quick & Easy: From mixing to decorating, you can have these cookies ready in about 2 hours—perfect for last-minute St. Paddy’s Day plans or a cozy afternoon in.
- Simple Ingredients: No need for specialty stores; you probably already have flour, butter, sugar, and eggs in your pantry.
- Perfect for Celebrations: Whether it’s a classroom party, a family brunch, or just a quiet snack, these cookies bring festive cheer without complicated steps.
- Crowd-Pleaser: Kids love the bright green icing, and adults appreciate the classic buttery flavor paired with that satisfying crunch.
- Unbelievably Delicious: The secret is in the royal icing—this recipe uses a tried-and-true technique for a perfectly smooth finish that dries firm but not brittle, making stacking and gifting a breeze.
What sets this recipe apart is the attention to detail—like chilling the dough just right to keep the shape crisp, or mixing the icing to the perfect consistency so it spreads easily but holds its form. It’s not just sugar cookies; it’s a little St. Patrick’s Day ritual that feels special without being intimidating.
After making these a few times (okay, maybe too many), I realized they’re the kind of treat that makes you pause, close your eyes, and savor that first bite. It’s like comfort food with a festive twist, and you don’t need to be a decorating expert to get it just right.
What Ingredients You Will Need
This recipe uses simple, wholesome ingredients to deliver that classic sugar cookie flavor and a perfectly smooth royal icing finish. Most are pantry staples, and substitutions are easy if needed.
- For the Sugar Cookies:
- All-purpose flour – 2 ¾ cups (345 g), sifted for a tender crumb
- Baking powder – 1 tsp, to give a slight lift
- Salt – ½ tsp, balances the sweetness
- Unsalted butter – 1 cup (227 g), softened (I prefer Plugrá for its creamy texture)
- Granulated sugar – 1 ¼ cups (250 g), for sweetness and crunch
- Large egg – 1, room temperature (helps bind the dough)
- Pure vanilla extract – 2 tsp, for that warm flavor
- Milk – 2 tbsp (30 ml), adds moisture and softens the dough
- For the Royal Icing:
- Powdered sugar – 4 cups (480 g), sifted to avoid lumps
- Egg whites – 2 large (or 4 tbsp of pasteurized meringue powder + 6 tbsp water as a safe alternative)
- Lemon juice – 1 tsp, brightens the flavor and helps set the icing
- Green gel food coloring – a few drops, for the shamrock hue (I like AmeriColor gels for vivid color)
Ingredient tips: Use room temperature butter and egg for easier mixing and better dough texture. If you want a gluten-free option, almond flour works but expect a softer cookie. For dairy-free, swap milk with any plant-based milk.
Equipment Needed
- Mixing bowls – a large one for the dough and a smaller one for the icing
- Electric mixer – handheld or stand mixer makes creaming butter and sugar a breeze
- Rolling pin – for evenly flattening dough (a silicone one is my favorite to avoid sticking)
- Shamrock-shaped cookie cutters – essential for the festive shapes; if you don’t have shamrocks, clover or heart shapes work too
- Baking sheets lined with parchment paper or silicone mats – to prevent sticking and promote even baking
- Piping bags and small round tips (#2 or #3) – for precise royal icing decoration (zip-top bags with a snipped corner can work too)
- Cooling racks – to let your cookies cool completely before icing
If you’re on a budget, parchment paper and plastic sandwich bags can replace silicone mats and piping bags without much fuss. Also, keeping your dough chilled using a simple plate or tray helps maintain cookie shape during baking, which I learned the hard way after a few floppy batches!
Preparation Method
- Mix dry ingredients: In a medium bowl, whisk together 2 ¾ cups (345 g) of all-purpose flour, 1 tsp baking powder, and ½ tsp salt. Set aside.
- Cream butter and sugar: Using an electric mixer, beat 1 cup (227 g) softened unsalted butter with 1 ¼ cups (250 g) granulated sugar until light and fluffy—about 3-4 minutes. The texture should look pale and creamy.
- Add egg and vanilla: Beat in 1 large room temperature egg and 2 tsp pure vanilla extract until fully combined. The mixture may look slightly curdled but that’s okay.
- Combine wet and dry: Gradually add the flour mixture in thirds, alternating with 2 tbsp (30 ml) milk, mixing on low speed. Stop as soon as the dough comes together—don’t overmix.
- Chill the dough: Flatten the dough into a disk, wrap in plastic, and refrigerate for at least 1 hour (or up to overnight). Chilling helps cookies hold their shape and makes rolling easier.
- Preheat oven: Set to 350°F (175°C). Line baking sheets with parchment paper.
- Roll and cut shapes: On a lightly floured surface, roll dough to about ¼ inch (6 mm) thickness. Use shamrock cookie cutters to cut shapes and place them 1 inch (2.5 cm) apart on prepared sheets.
- Bake: Bake for 8-10 minutes until edges are just starting to turn golden. Cookies should be firm but not browned. Remove and cool on wire racks completely before decorating.
- Make royal icing: In a clean bowl, beat 4 cups (480 g) powdered sugar with 2 large egg whites (or meringue powder mix) and 1 tsp lemon juice until stiff peaks form—about 5-6 minutes on high speed. Add green gel food coloring drop by drop until you reach your desired shamrock green.
- Decorate: Transfer icing to piping bags. Outline the cookies first and then fill in with thinner icing for smooth coverage. Let icing dry at room temperature for at least 4 hours, or overnight for best results.
Pro tip: If your icing is too thick to flood, add a few drops of water at a time. Too thin? Add more powdered sugar. Patience here rewards you with that perfect, glossy finish.
Cooking Tips & Techniques
Royal icing can intimidate many, but here’s the deal: the trick is in the consistency and patience. When you pipe the outline, keep the icing thicker—this acts like a dam. For flooding, thin it just enough to spread smoothly but not run off the edges.
I’ve learned the hard way that chilling the dough is non-negotiable. Skipping that step leads to cookies that spread and lose their shape, which is especially disappointing with shamrocks! Also, rolling the dough evenly helps with uniform baking.
When decorating, multitasking is key. While one batch bakes and cools, prepare your icing and cut the next batch of cookies. This keeps the workflow smooth and avoids rushed decorating.
Lastly, avoid humidity on icing day. High moisture can keep your royal icing sticky longer. A dry, cool room makes all the difference for crisp, beautiful results.
Variations & Adaptations
- Flavored Icing: Add a few drops of peppermint or almond extract to your royal icing for a subtle twist that pairs beautifully with the classic sugar cookie base.
- Gluten-Free Version: Swap all-purpose flour with a gluten-free baking blend. I recommend adding ¼ tsp xanthan gum if your blend doesn’t contain it to help with texture.
- Vegan Adaptation: Use a vegan butter substitute and replace eggs with a flax egg (1 tbsp ground flaxseed + 3 tbsp water). For royal icing, meringue powder replaces egg whites safely.
- Seasonal Colors: Instead of just green, mix in gold or white icing accents for a festive St. Patrick’s Day look. You could even try edible gold dust for a fancy sparkle.
- Personal Favorite: I once added a tiny bit of finely chopped crystallized ginger to the dough—unexpected warmth under all that sweet, and it was a hit at a neighborhood gathering.
If you’re curious, pairing these cookies with a glass of Irish cream coffee or a light green tea makes for a cozy afternoon. For a savory twist before dessert, you might enjoy the quick and zesty lemon chicken recipe that works great for a St. Paddy’s Day feast.
Serving & Storage Suggestions
Serve these shamrock sugar cookies at room temperature, ideally after the royal icing is fully set—this means no sticky fingers or smudged designs. They look lovely arranged on a festive platter with a sprinkle of edible glitter or alongside a pot of Irish breakfast tea.
Leftovers keep well in an airtight container for up to a week. If you want to save them longer, freeze un-iced cookies in a sealed bag for up to 3 months; just thaw before decorating. Icing-covered cookies freeze okay if wrapped tightly, but the texture changes slightly.
Reheating isn’t recommended, but letting cookies sit overnight lets flavors meld and the sugar mellow, making them even more enjoyable the next day.
Nutritional Information & Benefits
Each cookie (about 3 inches/7.5 cm) contains roughly 150-180 calories, with most coming from sugar and butter. While these aren’t health food, they offer a little festive indulgence with real ingredients—no artificial preservatives or fillers.
Butter provides vitamin A, and the eggs in royal icing add protein, albeit in small amounts. For those mindful of allergens, the recipe includes eggs and gluten, but substitutions can be made easily.
From a wellness standpoint, enjoying a treat like this in moderation, especially one made from scratch, can be part of a balanced, joyful approach to eating.
Conclusion
These Perfect Shamrock Sugar Cookies with Royal Icing have become my go-to for adding a little magic to St. Patrick’s Day. They’re straightforward enough for a beginner but satisfying enough to impress anyone who gets a bite. Plus, the ritual of making and decorating them brings a quiet happiness that’s hard to beat.
Feel free to tweak the colors, flavors, or shapes to match your style—this recipe is a canvas for your creativity. And if you want to round out your holiday meal, a quick and creamy tuna pasta or a zesty lemon chicken works wonders alongside these sweet treats.
Give these cookies a try and see how a few simple ingredients and a bit of time can turn into something truly special. I’d love to hear how you make them your own!
FAQs
Can I make the cookie dough ahead of time?
Absolutely! The dough can be refrigerated for up to 3 days or frozen for up to 3 months. Just thaw in the fridge before rolling out.
Is it safe to use raw egg whites in royal icing?
Raw egg whites carry a small risk of salmonella, so many prefer using pasteurized meringue powder as a safer alternative. Both work well for royal icing.
How do I prevent my cookies from spreading too much?
Chilling the dough before cutting and baking is key. Also, make sure your butter isn’t too soft or melted when mixing.
Can I use other food coloring besides green?
Yes! You can customize colors to suit your theme. Gel-based food colorings are best as they don’t thin the icing.
How long does royal icing take to dry?
Royal icing usually dries to the touch within 1-2 hours but should be left to fully harden for at least 4 hours or overnight for stacking or packaging.
Pin This Recipe!
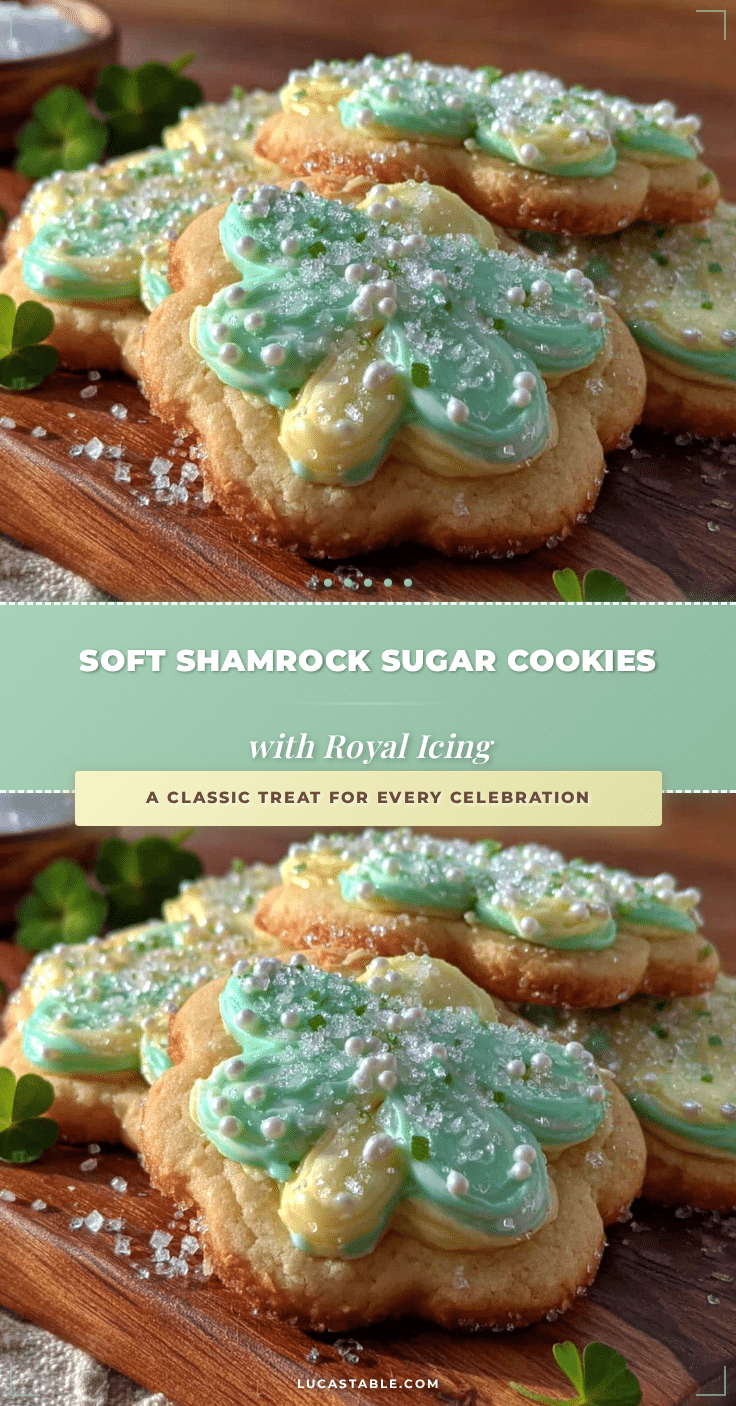
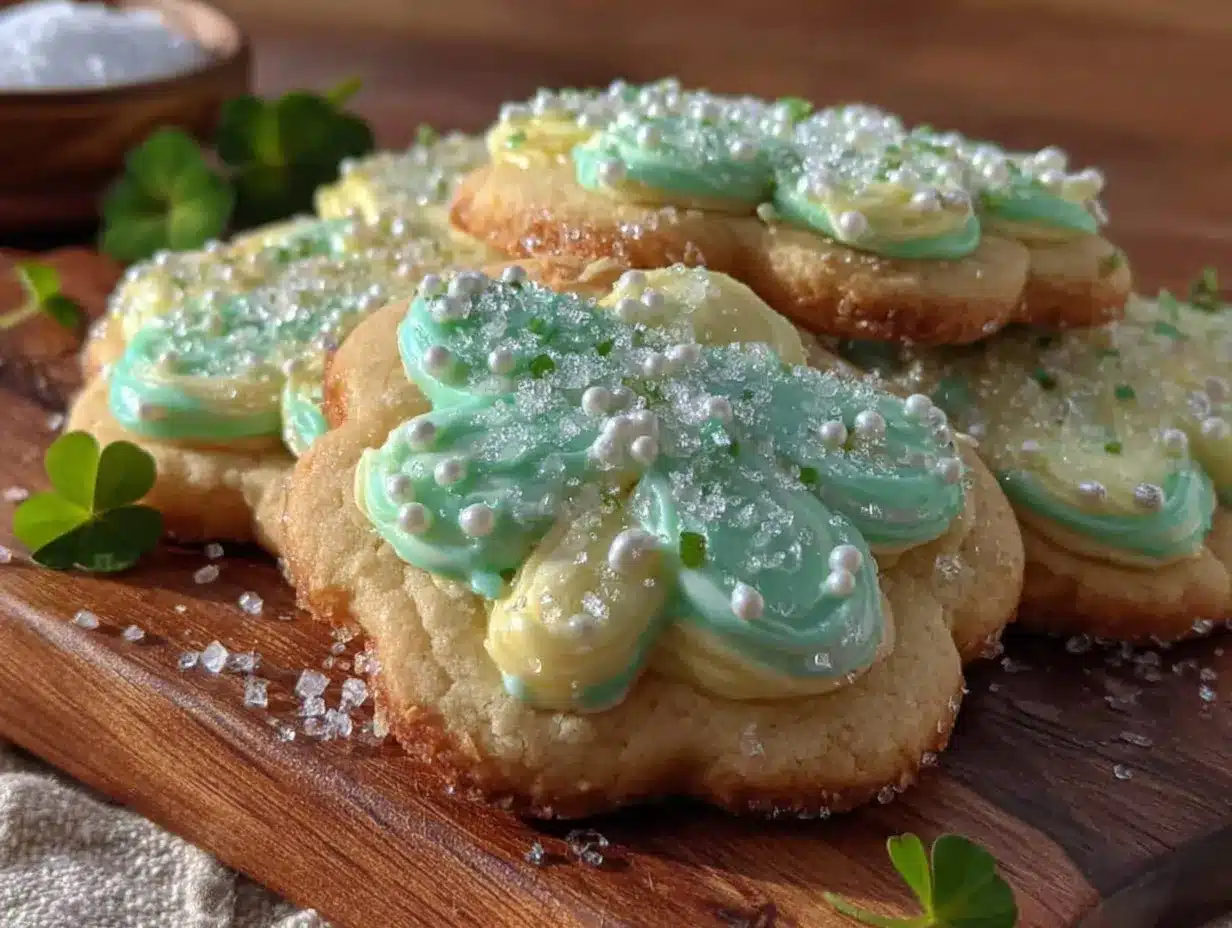
Perfect Shamrock Sugar Cookies with Royal Icing

These shamrock-shaped sugar cookies balance soft and crisp textures, topped with smooth, shiny royal icing perfect for St. Patrick’s Day celebrations. Easy to make and decorate, they bring festive cheer with simple ingredients and a joyful baking ritual.
- Prep Time: 20 minutes
- Cook Time: 10 minutes
- Total Time: 2 hours
- Yield: 24 cookies 1x
- Category: Dessert
- Cuisine: American
Ingredients
- 2 ¾ cups (345 g) all-purpose flour, sifted
- 1 tsp baking powder
- ½ tsp salt
- 1 cup (227 g) unsalted butter, softened
- 1 ¼ cups (250 g) granulated sugar
- 1 large egg, room temperature
- 2 tsp pure vanilla extract
- 2 tbsp (30 ml) milk
- 4 cups (480 g) powdered sugar, sifted
- 2 large egg whites (or 4 tbsp pasteurized meringue powder + 6 tbsp water)
- 1 tsp lemon juice
- Green gel food coloring, a few drops
Instructions
- In a medium bowl, whisk together flour, baking powder, and salt. Set aside.
- Using an electric mixer, beat softened butter and granulated sugar until light and fluffy, about 3-4 minutes.
- Beat in the egg and vanilla extract until fully combined.
- Gradually add the flour mixture in thirds, alternating with milk, mixing on low speed until dough comes together. Do not overmix.
- Flatten dough into a disk, wrap in plastic, and refrigerate for at least 1 hour or up to overnight.
- Preheat oven to 350°F (175°C). Line baking sheets with parchment paper.
- Roll dough on a lightly floured surface to about ¼ inch (6 mm) thickness. Cut shapes with shamrock cookie cutters and place 1 inch apart on baking sheets.
- Bake for 8-10 minutes until edges start to turn golden but cookies are not browned. Cool completely on wire racks.
- For royal icing, beat powdered sugar, egg whites (or meringue powder mix), and lemon juice until stiff peaks form, about 5-6 minutes on high speed.
- Add green gel food coloring drop by drop until desired color is reached.
- Transfer icing to piping bags. Outline cookies with thicker icing, then flood with thinner icing for smooth coverage.
- Let icing dry at room temperature for at least 4 hours or overnight for best results.
Notes
Chill dough for at least 1 hour to prevent spreading and maintain shape. Adjust royal icing consistency by adding water if too thick or powdered sugar if too thin. Use pasteurized meringue powder as a safer alternative to raw egg whites. Avoid humidity when drying icing for best results.
Nutrition
- Serving Size: 1 cookie (about 3 in
- Calories: 165
- Sugar: 16
- Sodium: 70
- Fat: 7
- Saturated Fat: 4
- Carbohydrates: 25
- Protein: 1
Keywords: shamrock sugar cookies, St. Patrick's Day cookies, royal icing cookies, easy sugar cookies, festive cookies, holiday baking