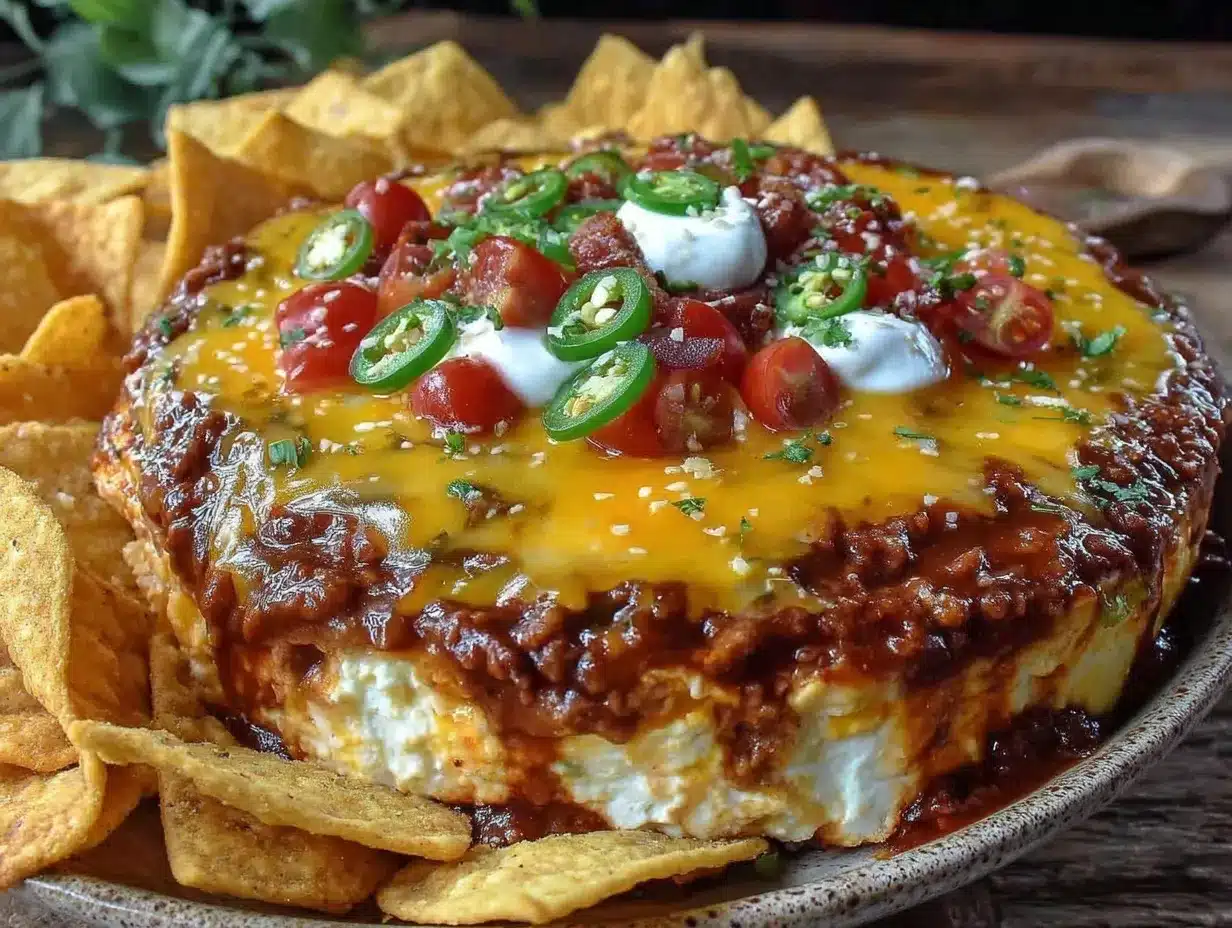
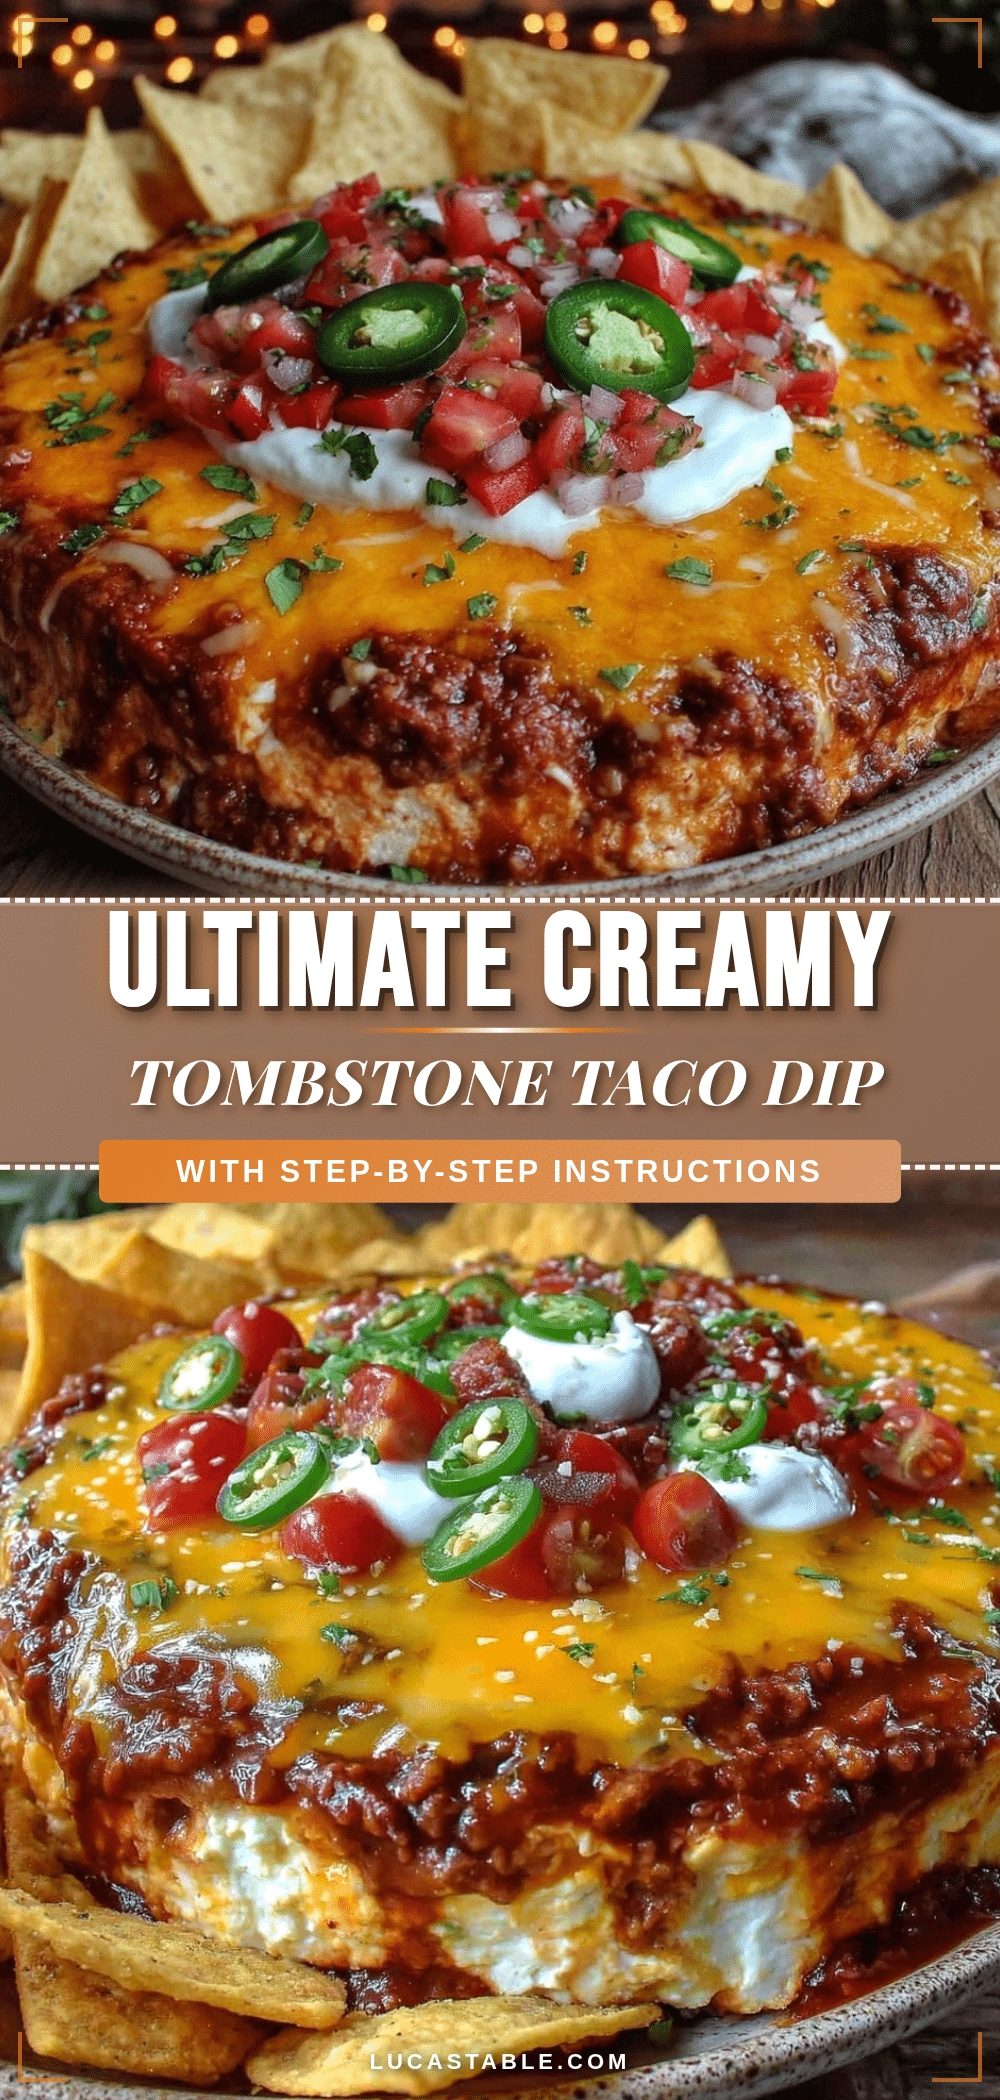
“Hey, you *have* to try this dip at the party!” Those words came from my cousin who’s usually not one to fuss over appetizers. I was skeptical at first—how special could a taco dip be? But when I arrived and saw the bubbling, golden cheese melting over a creamy, zesty base, all topped with fresh, bright veggies, I was hooked. Honestly, it felt like comfort food and fiesta vibes collided in one perfect dish.
What really sold me was how simple it was to throw together, yet the flavor was so layered and satisfying. That night, I couldn’t stop sneaking bites between conversations, and before I knew it, folks were asking for the recipe. I didn’t expect a “tombstone” taco dip (a name I later learned was a nod to its rustic, hearty look) to become my go-to party dish, but here we are.
There’s something about the mix of creamy layers with that melty cheese on top, plus the crunch and freshness of toppings like diced tomatoes and green onions, that just feels… right. It’s the kind of dish that makes you pause for a second, close your eyes, and enjoy. No fuss, no complicated steps, just straight-up crowd-pleasing goodness.
And between you and me, it’s become my secret weapon when I want to impress without the stress. I’ve even brought it along to family game nights and potlucks, and it disappears faster than you can say “guacamole.” I’m pretty sure once you try this creamy tombstone taco dip with melty cheese and fresh toppings, it’ll sneak its way into your rotation too.
Why You’ll Love This Recipe
I’ve tested this recipe multiple times, tweaking it just enough to get that perfect balance of creamy, cheesy, and fresh flavors. It’s not just any taco dip—this one stands out because of its smooth texture and the way the cheese melts into the creamy layers beneath. Here’s why you’ll find yourself making it again and again:
- Quick & Easy: Comes together in under 20 minutes, making it ideal for last-minute gatherings or casual weeknight snacks.
- Simple Ingredients: No tricky or exotic items here—you probably already have most of this in your pantry or fridge.
- Perfect for Parties: Whether it’s game day, a casual get-together, or a potluck, this dip always gets rave reviews.
- Crowd-Pleaser: Kids and adults alike can’t resist the creamy base layered with melty cheese and topped with fresh, colorful veggies.
- Unbelievably Delicious: The creaminess paired with the lightly spiced taco seasoning and the fresh crunch is honestly next-level comfort food.
What makes this recipe different? It’s all about the layers. Using a blend of cream cheese and sour cream creates a luscious, smooth base that’s not too heavy. Then the taco seasoning is balanced just right—no overpowering spice, but enough to bring that classic taco flavor. And topping it with melty shredded cheese that’s broiled until bubbly gives it that irresistible golden crust. Plus, fresh toppings like ripe tomatoes, crisp green onions, and cool black olives add texture and brightness. This isn’t just another dip; it’s a little celebration in every bite.
Honestly, after the first spoonful, you might find yourself closing your eyes and thinking, “Yep, this is exactly what I needed today.” It’s comfort food reimagined for busy people who want flavor without a ton of effort. If you’ve tried my quick crispy BBQ chicken pizza, you know I’m all about fast, flavorful recipes that deliver. This dip fits right in with that vibe.
What Ingredients You Will Need
This recipe uses simple, wholesome ingredients to deliver bold flavor and satisfying texture without the fuss. Most of these are pantry staples, and you can easily swap or omit a few depending on what you have handy.
- Cream cheese, softened (adds rich creaminess; I prefer Philadelphia brand for consistent texture)
- Sour cream (full fat for best flavor, but Greek yogurt works as a tangier substitute)
- Shredded cheddar cheese (sharp or mild, depending on your taste; Cabot is a reliable choice)
- Shredded Monterey Jack cheese (for that melty, gooey effect)
- Taco seasoning mix (homemade or store-bought, just go easy so it doesn’t overpower)
- Refried beans (optional but adds extra heartiness; I like to use low-sodium for less salt)
- Diced tomatoes, drained (fresh or canned, adds juiciness and brightness)
- Sliced black olives (gives a nice briny contrast)
- Green onions, thinly sliced (fresh crunch and mild onion flavor)
- Jalapeños, diced (optional, for a little kick)
- Fresh cilantro, roughly chopped (adds herbal freshness but optional if you’re not a fan)
- Tortilla chips, for serving (choose sturdy ones to scoop up the dip without breaking)
If you want to make this dip gluten-free, just double-check your taco seasoning and chips. For a lighter version, swap sour cream with plain Greek yogurt, and use reduced-fat cheeses. In summer, I like to swap diced tomatoes for fresh pico de gallo—it adds a nice zing. And if you’re feeling adventurous, adding a layer of cooked, seasoned ground beef or shredded chicken turns this into a meal-worthy dip.
Equipment Needed
- Mixing bowl – a medium to large size to comfortably combine ingredients
- Hand mixer or sturdy spoon – for smooth blending of cream cheese and sour cream
- Baking dish – an 8×8-inch glass or ceramic dish works perfectly
- Grater – if shredding your own cheese (freshly shredded melts better than pre-shredded)
- Measuring cups and spoons – to keep ingredient ratios spot on
- Oven or broiler – to melt and brown the cheese topping
No fancy gadgets needed here. If you don’t have a hand mixer, no worries—a strong spoon and some elbow grease do the trick. I once used a cast iron skillet for baking when I didn’t have a dish handy, and it worked just fine (just be careful when handling hot cast iron!). For budget-friendly options, glass baking dishes from the dollar store heat evenly and clean up easily.
Preparation Method
- Preheat your oven to 375°F (190°C). This ensures it’s hot enough to melt the cheese perfectly without drying out the dip.
- In your mixing bowl, combine 8 oz (225 g) softened cream cheese and 1 cup (240 ml) sour cream. Use a hand mixer on medium speed or a sturdy spoon to beat until smooth and creamy. This step is key for that velvety base texture.
- Stir in 1 tablespoon taco seasoning. Taste and adjust if needed—remember you want flavor without overwhelming heat.
- Spread half a cup (120 g) of refried beans evenly in the bottom of your 8×8-inch baking dish. This optional layer adds heartiness and helps the dip hold together.
- Layer the cream cheese mixture over the beans (or directly into the dish if skipping beans), smoothing it out evenly. Use a spatula to get a nice flat surface.
- Sprinkle 1 cup (115 g) shredded cheddar and 1 cup (115 g) shredded Monterey Jack evenly over the top. Don’t skimp here—the cheese is what makes this dish irresistible.
- Bake for 15-18 minutes. You want the cheese melted, bubbly, and just starting to turn golden brown on the edges. Keep an eye on it to avoid burning.
- Remove from oven and let sit for 5 minutes. This helps the dip set slightly, making it easier to scoop.
- Top with diced tomatoes (about ½ cup or 90 g), sliced black olives (¼ cup, 35 g), green onions (2-3 stalks), diced jalapeños (if using), and fresh cilantro. The fresh toppings add a crisp, vibrant contrast to the creamy base.
- Serve warm with sturdy tortilla chips. For extra fun, line a serving platter with chips and spoon the dip in the center, letting guests scoop as they please.
Tip: If the cheese browns too quickly under your oven’s broiler, lower the rack or tent the dip loosely with foil. Also, don’t skip letting the dip rest—it makes scooping so much easier and keeps everything intact.
Cooking Tips & Techniques
One thing I learned the hard way is that cream cheese needs to be softened to blend smoothly. Cold cream cheese leads to lumps and a less creamy dip. So, take it out of the fridge at least 30 minutes before starting or soften gently in the microwave in 10-second bursts.
Another pro tip: freshly shredded cheese melts better than pre-shredded bags, which often contain anti-caking agents. If you want that perfect melty cheese layer, it’s worth the extra minute to shred yourself.
When spreading layers, don’t rush. A smooth, even base means every bite has balanced flavor and texture. And if you add the optional refried beans, spreading them evenly helps the dip hold together better when scooping.
Timing is crucial, especially when baking. Keep an eye on the cheese layer so it’s bubbly and golden, not burnt. If your oven runs hot, check after 12 minutes. This dip can also be broiled for 2-3 minutes at the end for extra browning, but watch it closely.
Lastly, multitasking works wonders here. While the dip bakes, prep your fresh toppings—dice tomatoes, slice olives, chop green onions—so everything’s ready to go once it’s out of the oven. This keeps the process smooth and stress-free.
Variations & Adaptations
This creamy tombstone taco dip is super adaptable, so you can customize it for different tastes or dietary needs.
- Meat Lover’s Version: Add a layer of cooked, seasoned ground beef or shredded chicken between the beans and cream cheese layers for a heartier dip.
- Vegetarian or Vegan: Skip the meat and use dairy-free cream cheese and cheese alternatives. Nutritional yeast can add cheesy flavor if you want to go fully vegan.
- Spicy Kick: Incorporate diced pickled jalapeños or add a dash of cayenne to the cream cheese mixture for extra heat.
- Low Carb: Use full-fat cream cheese and sour cream, skip the beans, and serve with sliced veggies or low-carb chips.
- Fresh Twist: Swap diced tomatoes for mango salsa or pineapple chunks for a sweet contrast.
Personally, I once tossed in some roasted corn kernels for a smoky crunch, which was a delightful surprise. Feel free to experiment with your favorite taco toppings—avocado chunks or a squeeze of lime juice on top adds a lovely brightness.
Serving & Storage Suggestions
This dip is best served warm so the cheese is still gooey and melty. Serve it straight from the baking dish with plenty of sturdy tortilla chips for scooping. If you want to dress it up, a side of fresh guacamole or a bowl of salsa complements it beautifully.
Leftovers store well—just cover the dish tightly with plastic wrap or transfer to an airtight container. Refrigerate for up to 3 days. When reheating, microwave in 30-second bursts or warm in a 350°F (175°C) oven until heated through and bubbly again.
Interestingly, letting the dip chill overnight helps the flavors meld and makes it easier to spread on crackers or toast for a different snack vibe. Just bring it back to room temp or warm slightly before serving.
Nutritional Information & Benefits
Per serving (rough estimate for 8 servings): about 250 calories, 18g fat, 10g protein, and 8g carbs. The creamy base provides calcium and some vitamin A, while fresh toppings add fiber and antioxidants.
Using fresh ingredients like tomatoes and green onions brings in extra vitamins and brightness without added calories. Opting for Greek yogurt in place of sour cream reduces fat and adds a protein boost. This dip fits nicely into gluten-free and low-carb diets with simple tweaks.
From a wellness perspective, it’s a satisfying way to enjoy indulgent flavors without going overboard. The balance of creamy and fresh keeps it feeling light enough to enjoy guilt-free at gatherings.
Conclusion
This creamy tombstone taco dip with melty cheese and fresh toppings is one of those recipes that feels like it’s always been part of my snack arsenal now. It’s easy, delicious, and a guaranteed hit whether you’re feeding a crowd or just craving something cozy and flavorful.
Feel free to tweak the toppings or add a personal twist—you might find your own favorite version that becomes a staple. I love how this dip brings people together, whether it’s a casual night with friends or a festive family gathering.
Give it a try, and if you like dishes that come together fast but pack a punch, you might also enjoy my quick flavorful 30-minute beef tacos or the quick crispy chicken quesadillas. Drop a comment and share how you customize your dip—I’d love to hear your take!
Here’s to many cozy, cheesy, delicious moments ahead.
FAQs About Creamy Tombstone Taco Dip
Can I prepare this dip ahead of time?
Yes! You can assemble the dip without the fresh toppings and refrigerate for up to 24 hours. Add the fresh toppings just before serving, then bake and enjoy.
What can I use instead of refried beans?
If you prefer to skip beans, you can leave that layer out or use mashed black beans for a different texture. It still tastes great without beans too!
How do I make this dip spicier?
Add diced jalapeños, a pinch of cayenne pepper, or hot sauce to the cream cheese mixture. You can also top with sliced pickled jalapeños for extra heat.
Can I freeze leftover dip?
While you can freeze the dip, the texture of the sour cream and cream cheese might change slightly. If you freeze, thaw overnight in the fridge and reheat gently.
What’s the best way to serve this dip for a crowd?
Serve it warm in a baking dish with plenty of sturdy tortilla chips around. You can also offer sliced veggies or crackers for variety and accommodate different preferences.
Pin This Recipe!
Creamy Tombstone Taco Dip

A quick and easy creamy taco dip layered with melty cheese and fresh toppings, perfect for parties and casual gatherings.
- Prep Time: 10 minutes
- Cook Time: 15-18 minutes
- Total Time: 25-28 minutes
- Yield: 8 servings 1x
- Category: Appetizer
- Cuisine: Mexican
Ingredients
- 8 oz softened cream cheese
- 1 cup sour cream
- 1 tablespoon taco seasoning mix
- 1/2 cup refried beans (optional)
- 1 cup shredded cheddar cheese
- 1 cup shredded Monterey Jack cheese
- 1/2 cup diced tomatoes, drained
- 1/4 cup sliced black olives
- 2–3 stalks green onions, thinly sliced
- Diced jalapeños (optional)
- Fresh cilantro, roughly chopped (optional)
- Tortilla chips, for serving
Instructions
- Preheat your oven to 375°F (190°C).
- In a mixing bowl, combine softened cream cheese and sour cream. Beat until smooth and creamy using a hand mixer or sturdy spoon.
- Stir in taco seasoning and adjust to taste.
- Spread refried beans evenly in the bottom of an 8×8-inch baking dish (optional).
- Layer the cream cheese mixture over the beans or directly into the dish if skipping beans, smoothing it out evenly.
- Sprinkle shredded cheddar and Monterey Jack cheese evenly over the top.
- Bake for 15-18 minutes until cheese is melted, bubbly, and golden brown on the edges.
- Remove from oven and let sit for 5 minutes to set.
- Top with diced tomatoes, sliced black olives, green onions, diced jalapeños (if using), and fresh cilantro.
- Serve warm with sturdy tortilla chips.
Notes
Soften cream cheese before mixing to avoid lumps. Use freshly shredded cheese for better melting. Watch cheese closely while baking to prevent burning. Let dip rest after baking for easier scooping. Optional refried beans add heartiness. Can be customized with meat or vegan alternatives.
Nutrition
- Serving Size: About 1/8 of the dip
- Calories: 250
- Fat: 18
- Carbohydrates: 8
- Protein: 10
Keywords: taco dip, creamy dip, party appetizer, melty cheese dip, easy dip recipe, taco seasoning, crowd-pleaser