I was standing in the frozen foods aisle at the grocery store last Tuesday, staring blankly at a box of pre-made meatloaf, when a specific, sweet-smoky scent hit me out of nowhere — and suddenly I was seven years old, standing on a step stool in my Aunt Josie’s tiny kitchen, watching her brush a thick, glossy glaze over a meatloaf that was about to feed ten people. The memory came that fast, like a door swinging open in my chest. I could practically feel the warmth of her oven on my face and hear the low hum of her ancient radio playing country music. I honestly forgot what I was even shopping for. I just stood there, holding a carton of eggs, completely transported.
Aunt Josie wasn’t a fancy cook. Let me tell you, her kitchen was a mess of mismatched bowls and a cracked pepper grinder that leaked all over the counter. But her meatloaf — that was her masterpiece. It wasn’t dry or boring like the ones I’d had at school cafeterias. It was tender, almost juicy, with this caramelized brown sugar crust that everyone at the table fought over. She never used a recipe, of course. She just knew how it should feel when she mixed it with her hands, and she always said the glaze was the “secret handshake” that made people come back for seconds. I tried to get her to write it down once, but she just laughed and told me to pay attention instead.
Maybe you’ve been there — chasing a taste from your past that you can’t quite replicate, but you keep trying anyway because the memory is worth it. That’s what this recipe is for me. It’s my best attempt at capturing that feeling, that specific alchemy of simple ingredients and a little bit of love, and turning it into something I can share with my own people. I’ve tested this version so many times, I’ve lost count. I’ve burned the glaze, I’ve over-mixed the meat, I’ve even forgotten the eggs once (don’t ask). But this version right here? This is the one. It’s the meatloaf that makes my friends text me the next day asking for the recipe. It’s the one that makes a Tuesday night dinner feel like a celebration. And honestly, it’s the one that finally made me stop staring at that box in the frozen aisle.
Why You’ll Love This Recipe
This isn’t just another meatloaf recipe. After about a dozen batches and a few very forgiving dinner guests, I can tell you this one is different. It’s the kind of main dish that makes you look like a hero with very little actual effort. Let me break down exactly why this classic meatloaf with brown sugar glaze deserves a permanent spot in your dinner rotation, especially when you’re cooking to impress.
- Perfect for a Crowd: This recipe scales beautifully. You can double it for a big party or potluck without any fuss. It’s the ultimate “feed a hungry group” meal.
- Simple Pantry Ingredients: No weird, hard-to-find items here. You probably have most of this in your kitchen right now. Ground beef, breadcrumbs, an egg, some ketchup — you know the drill.
- That Unforgettable Glaze: The brown sugar glaze is the star. It’s sweet, tangy, and gets a little sticky-caramelized on the edges. It’s what makes people close their eyes after the first bite.
- Impossibly Moist: Dry meatloaf is a tragedy. This version uses a simple trick — a little milk and a gentle hand — to keep it tender and juicy every single time.
- Make-Ahead Magic: You can prep the whole thing the night before your dinner party. Just pop it in the oven when your guests arrive, and your house smells amazing. Stress-free hosting at its finest.
What really sets this recipe apart is the technique. I’m not just throwing ingredients in a bowl. I soak the breadcrumbs in milk first, which creates a panade — a fancy word for a paste that locks in moisture. It’s a pro-level trick that makes a world of difference. Plus, the glaze isn’t just slapped on top. You apply it in layers, letting it bake and caramelize into that signature sticky crust. It’s not complicated, but it’s intentional. And that intention is exactly what turns a simple meatloaf into a dinner party centerpiece. I’ve served this to my pickiest friends and my most hard-to-please family members, and it has never, ever let me down.
What Ingredients You Will Need
This recipe uses simple, wholesome ingredients that work together to create something truly special. Most of these are probably already in your pantry or fridge, which is exactly how I like it. Here’s what you’ll need, along with a few notes from my own kitchen trials.
For the Meatloaf:
- 2 pounds ground beef (80/20 blend): This is important. You want a little fat for flavor and moisture. Leaner blends like 90/10 can result in a drier loaf. I usually grab a package from my local butcher, but any good-quality ground beef works.
- 1 cup plain breadcrumbs: Panko works great here too, and gives a slightly lighter texture. I’ve used Italian-seasoned breadcrumbs in a pinch, but plain gives you more control over the final flavor.
- 1/2 cup whole milk: This is for the panade. It soaks into the breadcrumbs and keeps the meat tender. You can use 2% or even oat milk in a pinch, but whole milk gives the richest result.
- 1 large egg, lightly beaten: The binder. It helps hold everything together. Make sure it’s room temperature for easier mixing.
- 1 medium yellow onion, finely diced: About 1 cup. Sauté it first if you want a milder flavor, but I like the little bits of texture it adds raw. Just dice it really fine.
- 3 cloves garlic, minced: Fresh is best here. The jarred stuff lacks that punchy, aromatic quality that really makes the meatloaf sing.
- 2 tablespoons Worcestershire sauce: Adds that deep, savory umami note. Lea & Perrins is my go-to brand.
- 1 teaspoon kosher salt: Don’t skimp. Salt brings out all the other flavors.
- 1/2 teaspoon black pepper: Freshly ground is always better.
- 1/2 teaspoon smoked paprika: This is my secret ingredient. It adds a subtle smokiness that complements the glaze perfectly. Regular paprika works too, but smoked is a game-changer.
- 1/4 teaspoon dried thyme: Just a little earthiness to round things out.
For the Brown Sugar Glaze:
- 1/2 cup ketchup: The base of the glaze. I recommend Heinz for that classic sweet-tangy balance.
- 1/4 cup packed light brown sugar: This is what caramelizes into that gorgeous, sticky crust. Dark brown sugar works too, and gives a deeper molasses flavor.
- 1 tablespoon apple cider vinegar: Adds a little acidity to cut through the sweetness. White vinegar is fine in a pinch.
- 1 teaspoon Worcestershire sauce: More umami depth.
- 1/2 teaspoon garlic powder: Not the same as fresh garlic, but it blends seamlessly into the glaze.
A quick note on substitutions: If you’re feeding a crowd with different dietary needs, you can swap the ground beef for a mix of ground pork and beef, or even ground turkey (just add a tablespoon of olive oil to keep it moist). For a gluten-free option, use gluten-free breadcrumbs or crushed pork rinds. And if you’re out of Worcestershire, a splash of soy sauce or balsamic vinegar can work in a pinch. I’ve tried all of these variations, and they each bring something a little different to the table.
Equipment Needed
You don’t need a fancy kitchen to make this meatloaf. Here’s what I use, along with some alternatives if you’re working with what you’ve got.
- Large mixing bowl: You need room to get your hands in there. A standard stainless steel bowl works perfectly.
- 9×5-inch loaf pan: This is the classic shape. I like a metal one for even heat distribution. Glass works too, but you might need to add a few minutes to the baking time.
- Baking sheet: Place the loaf pan on a baking sheet to catch any drips from the glaze. It saves you a messy oven cleanup.
- Measuring cups and spoons: For accuracy. I’ve eyeballed it before, and it’s never as good.
- Chef’s knife and cutting board: For dicing the onion and mincing the garlic.
- Small bowl: For mixing the glaze.
- Pastry brush or spoon: To apply the glaze. A brush gives a more even coat, but a spoon works just fine.
- Meat thermometer: This is non-negotiable for me. It’s the only way to guarantee a perfectly cooked, safe-to-eat meatloaf. I use a simple digital instant-read one.
If you don’t have a loaf pan, you can shape the meatloaf into a free-form loaf on a lined baking sheet. It’ll cook a little faster, so keep an eye on the internal temperature. And honestly, I’ve used a cast iron skillet in a pinch — it gives the edges a nice crust, but you’ll lose some of the juices. My favorite tool for this recipe is actually my hands. You just can’t mix meatloaf properly with a spoon. Get in there. It’s part of the fun.
Preparation Method
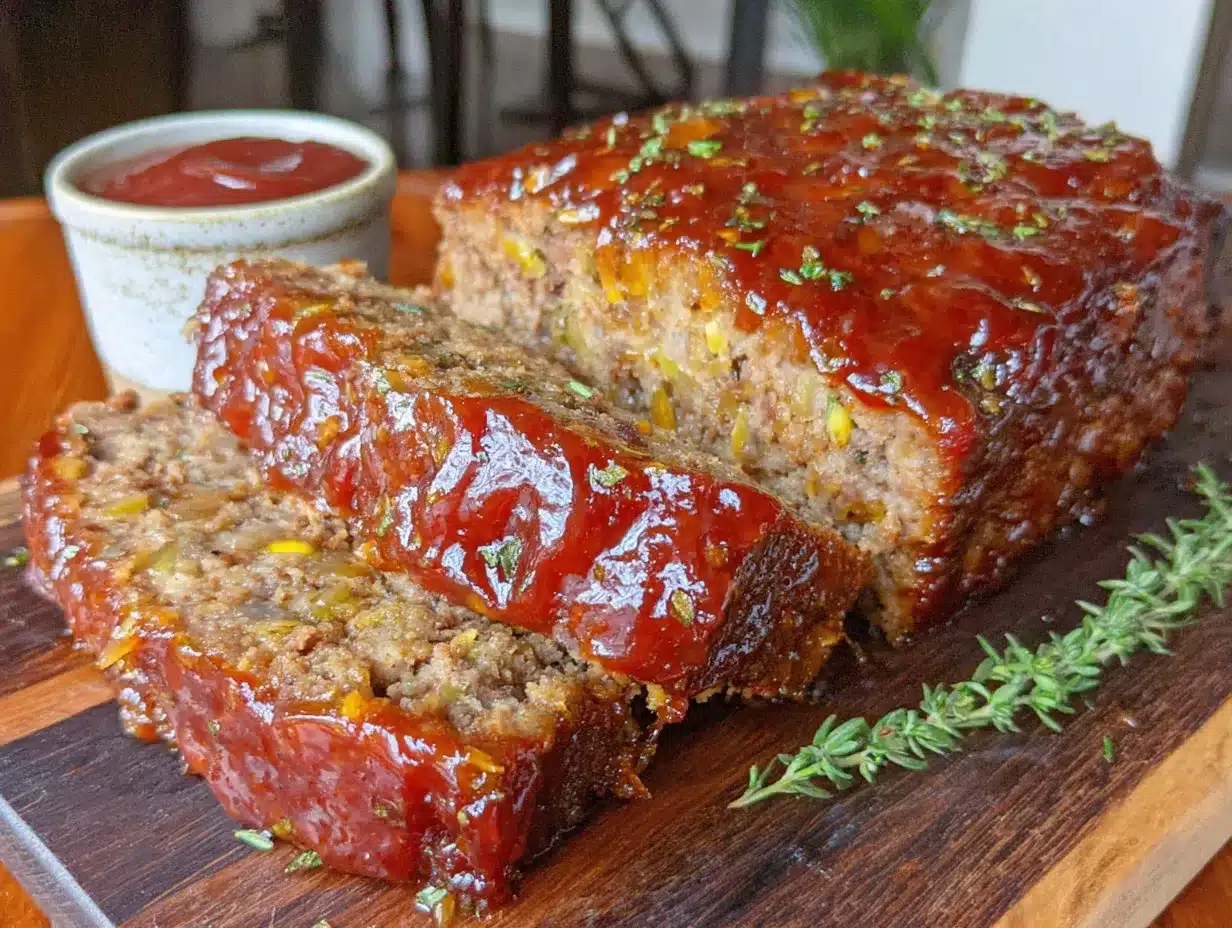
Alright, let’s get to it. I’ve broken this down into clear steps so you can follow along without any stress. Remember, this is about feeding the people you love, so don’t overthink it. Here’s how to make the best classic meatloaf with brown sugar glaze.
- Preheat your oven to 350°F (175°C). Get this going first so it’s nice and hot when your meatloaf is ready. Place a rack in the middle of the oven.
- Make the panade. In your large mixing bowl, combine the 1 cup of breadcrumbs and 1/2 cup of milk. Stir them together with a fork until the breadcrumbs are fully soaked and it looks like a thick paste. Let it sit for 5 minutes while you prep the other ingredients. This step is the secret to a moist meatloaf — don’t skip it.
- Prep your aromatics. Dice your onion finely. I mean really fine — you want the flavor, not big chunks of onion in every bite. Mince your garlic cloves. If you’re sensitive to raw onion, you can sauté the onion in a little oil for 3-4 minutes until translucent, then let it cool before adding it to the mix. I do this sometimes for a milder flavor.
- Mix the meatloaf base. To the bowl with the panade, add the 2 pounds of ground beef, beaten egg, diced onion, minced garlic, 2 tablespoons Worcestershire sauce, 1 teaspoon salt, 1/2 teaspoon pepper, 1/2 teaspoon smoked paprika, and 1/4 teaspoon dried thyme. Now, here’s the important part: use your hands to gently mix everything together. Don’t squeeze or overwork the meat. Just fold and combine until you can’t see any more streaks of breadcrumb mixture. Overmixing makes meatloaf tough. I learned this the hard way after a particularly dense loaf that my dog politely refused to eat.
- Shape the loaf. Transfer the meat mixture to your 9×5-inch loaf pan. Gently press it into the pan, making sure it’s evenly distributed. Don’t pack it down like you’re making a sandcastle — just a light, even press. Shape the top into a slight dome if you want a more traditional look.
- Make the brown sugar glaze. In a small bowl, whisk together the 1/2 cup ketchup, 1/4 cup packed brown sugar, 1 tablespoon apple cider vinegar, 1 teaspoon Worcestershire sauce, and 1/2 teaspoon garlic powder. Mix until the sugar is mostly dissolved. Taste it. It should be sweet, tangy, and a little savory. Adjust with a pinch more salt if needed.
- Apply the first layer of glaze. Spoon about half of the glaze over the top of the meatloaf. Use a pastry brush or the back of your spoon to spread it evenly over the top and let it drip down the sides a little. This first layer will bake into the meat and create a base for the caramelized crust.
- Bake the meatloaf. Place the loaf pan on your baking sheet and put it in the preheated oven. Bake for 45 minutes. Your kitchen is going to start smelling incredible right about now.
- Apply the second layer of glaze. After 45 minutes, carefully pull the oven rack out and spoon the remaining glaze over the meatloaf. Spread it evenly again. This second layer is what creates that thick, sticky, caramelized crust that everyone loves.
- Finish baking. Return the meatloaf to the oven and bake for another 15-20 minutes. The total baking time should be about 60-65 minutes. The internal temperature should reach 160°F (71°C) when measured with a meat thermometer inserted into the center of the loaf. The glaze should be bubbly and dark around the edges.
- Rest before slicing. This is crucial. Remove the meatloaf from the oven and let it rest in the pan for 10-15 minutes. This allows the juices to redistribute throughout the loaf. If you slice it right away, it will fall apart and be dry. I know it’s hard to wait, but trust me. Use this time to set the table or pour yourself a glass of wine.
- Slice and serve. After resting, carefully slice the meatloaf into 1-inch thick slices. Use a sharp knife and a gentle sawing motion to keep the slices intact. Transfer to a serving platter and spoon any extra pan juices over the top.
And there you have it. A beautiful, classic meatloaf with a glossy brown sugar glaze that looks like you spent hours on it. But we know the truth, don’t we?
Cooking Tips & Techniques
I’ve made this recipe more times than I can count, and I’ve picked up a few tricks along the way. Here’s what I wish someone had told me when I first started making meatloaf.
Don’t overmix, ever. I cannot stress this enough. Mix just until everything is combined. When you overwork the ground beef, the proteins tighten up and you end up with a dense, tough loaf. Think of it like making burger patties — a gentle hand is your best friend. I once timed myself and found that 30 seconds of gentle folding is all it takes.
Use a meat thermometer. This is the only reliable way to know when your meatloaf is done. The USDA recommends 160°F for ground beef. I’ve pulled mine out at 155°F and let the carryover cooking bring it up to 160°F during the rest. It’s a little trick that keeps it from drying out. My favorite thermometer cost me twelve bucks and has saved dozens of dinners.
Let it rest. I know I already said this, but it’s worth repeating. Resting is not optional. It’s the difference between a slice that holds its shape and a crumbly mess on your plate. Set a timer if you have to.
Make a double batch of glaze. Honestly, you can never have too much of that brown sugar glaze. I sometimes make an extra half batch to serve on the side. People love to drizzle more on their slices. It’s a simple thing that makes the meal feel extra special.
Line your pan with parchment paper. This is a game-changer for cleanup. Cut a strip of parchment paper that hangs over the long sides of your loaf pan. After the meatloaf rests, you can lift it right out using the paper overhang. No sticking, no scrubbing. I started doing this after a particularly stubborn cleanup incident, and I’ll never go back.
Toast your breadcrumbs first. For an extra layer of flavor, you can toast the breadcrumbs in a dry skillet over medium heat for 2-3 minutes until golden. Let them cool before making the panade. It adds a subtle nuttiness that really elevates the dish. It’s a small step, but it makes a difference.
Variations & Adaptations
This recipe is a fantastic base, but don’t be afraid to make it your own. Here are some variations I’ve tried and loved, perfect for different occasions or dietary needs.
Turkey Meatloaf: Swap the ground beef for 2 pounds of ground turkey (93/7 is best). Add 2 tablespoons of olive oil to the mix to keep it from drying out. Turkey is leaner, so it needs a little extra fat. I’ve also added a grated zucchini (squeeze out the excess water) for extra moisture. It’s a lighter version that still satisfies that comfort food craving.
Cheesy Stuffed Meatloaf: For a show-stopping center, press half the meat mixture into the pan, make a shallow well down the middle, and fill it with 1 cup of shredded mozzarella or cheddar cheese. Top with the remaining meat mixture, seal the edges, and bake as directed. When you slice it, you get a glorious cheese pull. This is my go-to for dinner parties when I want to hear a few “oohs” and “aahs.”
Spicy Southwest Meatloaf: Add 1 diced jalapeño (seeds removed for less heat), 1/2 cup of corn kernels, and 1/2 teaspoon of cumin to the meat mixture. Replace the smoked paprika with chili powder. For the glaze, mix in a tablespoon of hot sauce or a pinch of cayenne pepper. This version is fantastic with a side of Mexican street corn salad.
Mini Meatloaves: For faster cooking and perfect portion control, divide the mixture into a 12-cup muffin tin. Press the mixture into each cup and top with the glaze. Bake for 20-25 minutes, or until the internal temperature reaches 160°F. These are great for meal prep or for feeding a crowd with different appetites. Kids love them too.
Gluten-Free Adaptation: Use gluten-free breadcrumbs or crushed gluten-free crackers (like Rice Chex or Schar table crackers). I’ve also used cooked quinoa with great success — it adds a nice texture and extra protein. Just make sure your Worcestershire sauce is gluten-free (Lea & Perrins is, but always double-check the label).
Serving & Storage Suggestions
This meatloaf is a star on its own, but the right sides can turn it into a full-blown feast. Here’s how I like to serve it and keep it for later.
Serving Temperature and Presentation: Serve the meatloaf warm, straight from the oven after its rest. Slice it on a cutting board and arrange the slices on a large platter. Spoon a little extra glaze or pan juices over the top for that glossy finish. Garnish with a sprinkle of fresh parsley or chopped chives for a pop of color. It’s a simple touch that makes it look restaurant-worthy.
What to Serve Alongside: This meatloaf is incredibly versatile. For a classic comfort meal, serve it with creamy mashed potatoes and roasted green beans. For a lighter option, a crisp garden salad with a tangy vinaigrette cuts through the richness perfectly. I also love serving it with roasted carrots or a simple buttered egg noodle. And don’t forget the bread — a crusty loaf to soak up any extra glaze on your plate is a non-negotiable in my house.
Storage Instructions: Leftover meatloaf is a gift. Let it cool completely, then wrap it tightly in plastic wrap or aluminum foil, or store it in an airtight container. It will keep in the refrigerator for 3-4 days. The flavors actually meld together overnight, so leftovers often taste even better the next day. I’ve been known to make a meatloaf sandwich for lunch that rivals any deli offering.
Freezing Instructions: You can freeze the baked meatloaf whole or in individual slices. Wrap it tightly in plastic wrap, then a layer of foil, and place it in a freezer-safe bag. It will keep for up to 3 months. To reheat, thaw it overnight in the refrigerator, then warm slices in a 350°F oven for 10-15 minutes, or in the microwave for a quick lunch. You can also freeze the unbaked meatloaf (without the glaze) for up to 3 months. Thaw in the fridge, add the glaze, and bake as directed, adding about 10 minutes to the cooking time.
Reheating Tips: The best way to reheat meatloaf without drying it out is in the oven. Place slices on a baking sheet, cover loosely with foil, and warm at 300°F for 10-15 minutes. For a single slice, the microwave works in a pinch — just cover it with a damp paper towel to add moisture. The glaze might not be as sticky after reheating, but the flavor is still there.
How Flavors Develop: I’ve noticed that the meatloaf is actually at its peak flavor on day two. The Worcestershire, garlic, and smoked paprika have had time to really meld together. The glaze soaks into the outer edges a bit, creating these little pockets of sweet-savory goodness. It’s a beautiful thing. So don’t be afraid to make this a day ahead — your future self will thank you.
Nutritional Information & Benefits
I’m not a nutritionist, but I do pay attention to what goes into my body. Here’s a general idea of what you’re getting in a serving of this classic meatloaf. Please note that these are estimates and can vary based on specific ingredients and portion sizes.
| Nutrient | Per Serving (1 slice, based on 8 servings) |
|---|---|
| Calories | ~380-420 |
| Protein | 28-32g |
| Fat | 22-26g |
| Carbohydrates | 18-22g |
| Fiber | 1-2g |
| Sugar | 10-12g |
| Sodium | 650-750mg |
Health Benefits of Key Ingredients: This isn’t health food, but it does have some redeeming qualities. The ground beef provides a solid dose of high-quality protein, iron, and B vitamins, which are essential for energy and muscle health. Onions and garlic are packed with antioxidants and have anti-inflammatory properties. The Worcestershire sauce, despite being used in small amounts, contains anchovies which are a source of omega-3 fatty acids. And hey, the brown sugar glaze might not be a superfood, but it makes people happy, and that counts for something.
Dietary Considerations: This recipe is not gluten-free (unless you use the adaptation above) and contains dairy from the milk. It is nut-free and egg-free if you omit the egg (you can use a flax egg as a binder instead). If you’re watching your sodium, you can reduce the salt in the meat mixture and use a low-sodium ketchup. For a lower-carb option, serve it with cauliflower mash instead of potatoes.
My Personal Wellness Perspective: I believe in balance. This meatloaf is a celebration dish for me — it’s what I make when I want to gather people around my table and share something comforting and delicious. I don’t stress about the calories or the sugar content on those nights. I focus on the joy of the meal, the laughter, and the connections. And then I eat a salad for lunch the next day. It’s all about finding that happy medium, you know?
Conclusion
This classic meatloaf with brown sugar glaze is more than just a recipe. It’s a way to bring people together, to create a moment of warmth and satisfaction that lingers long after the plates are cleared. It’s the dish that gets requested for birthdays, the one that makes a rainy Tuesday feel like a Sunday supper, the one that your friends will text you about the next morning.
I’ve put a lot of love and a few honest mistakes into perfecting this version, and I truly believe it’s the best way to make meatloaf. It’s forgiving enough for a weeknight but impressive enough for a dinner party. It’s simple, it’s delicious, and it’s made to be shared. So go ahead and make it your own. Add a little extra garlic if that’s your thing. Swap in ground turkey if you’re feeling lighter. Double the glaze because, honestly, why wouldn’t you?
I’d love to hear how it turns out for you. Did you add a secret ingredient? Did your kids ask for seconds? Did you finally recreate that taste from your own childhood? Drop a comment below and let me know. And if you share a photo on Pinterest or Instagram, tag me — I want to see your beautiful, glazed masterpiece. Until next time, happy cooking, and remember: the best meals are the ones made with a little bit of heart and a whole lot of brown sugar.
Frequently Asked Questions
Can I make this meatloaf ahead of time?
Absolutely! You can assemble the meatloaf (without the glaze) up to 24 hours in advance. Cover it tightly with plastic wrap and store it in the refrigerator. When you’re ready to bake, add the glaze and follow the baking instructions. You might need to add 5-10 minutes to the cooking time since you’re starting from a cold loaf.
Why did my meatloaf fall apart when I sliced it?
This usually happens for one of two reasons: it didn’t have enough binder (egg and breadcrumbs) or it wasn’t rested long enough. Make sure you’re using the full cup of breadcrumbs and letting the meatloaf rest for at least 10 minutes after baking. The rest time allows the juices to reabsorb and the structure to set. If it’s still falling apart, try adding an extra tablespoon of breadcrumbs next time.
Can I use ground pork or a meatloaf mix instead of beef?
Yes, and I highly recommend it! A mix of ground beef, pork, and veal (sometimes called “meatloaf mix”) adds incredible flavor and richness. If you’re using all pork, it will be a bit fattier and more tender. Just adjust the cooking time slightly — pork needs to reach an internal temperature of 160°F as well, so the same guidelines apply.
How do I prevent the glaze from burning?
The brown sugar in the glaze can burn if it’s exposed to high heat for too long. That’s why I apply it in two stages. The first layer goes on at the beginning and bakes into the meat. The second layer goes on during the last 15-20 minutes, which is enough time to caramelize without burning. If you notice the glaze getting too dark, tent the meatloaf loosely with foil for the remaining baking time.
Can I cook this in a slow cooker or an air fryer?
You can! For a slow cooker, shape the meatloaf and place it on a foil sling in the slow cooker. Cook on low for 4-5 hours or on high for 2-3 hours. Apply the glaze in the last 30 minutes. For an air fryer, shape the meatloaf to fit in your air fryer basket and cook at 350°F for 25-30 minutes, or until it reaches 160°F internally. Apply the glaze halfway through. Note that the texture will be slightly different — the air fryer gives a firmer crust, while the slow cooker yields a softer, more tender loaf.
Pin This Recipe!
Best Classic Meatloaf with Brown Sugar Glaze
This isn’t just another meatloaf recipe. It’s tender, almost juicy, with a caramelized brown sugar crust that everyone at the table fights over. The brown sugar glaze is the star — sweet, tangy, and gets a little sticky-caramelized on the edges.
- Prep Time: 20 minutes
- Cook Time: 60 minutes
- Total Time: 1 hour 20 minutes
- Yield: 8 servings 1x
- Category: Main Course
- Cuisine: American
Ingredients
- 2 pounds ground beef (80/20 blend)
- 1 cup plain breadcrumbs
- 1/2 cup whole milk
- 1 large egg, lightly beaten
- 1 medium yellow onion, finely diced (about 1 cup)
- 3 cloves garlic, minced
- 2 tablespoons Worcestershire sauce
- 1 teaspoon kosher salt
- 1/2 teaspoon black pepper
- 1/2 teaspoon smoked paprika
- 1/4 teaspoon dried thyme
- 1/2 cup ketchup
- 1/4 cup packed light brown sugar
- 1 tablespoon apple cider vinegar
- 1 teaspoon Worcestershire sauce
- 1/2 teaspoon garlic powder
Instructions
- Preheat your oven to 350°F (175°C). Place a rack in the middle of the oven.
- Make the panade: In a large mixing bowl, combine 1 cup breadcrumbs and 1/2 cup milk. Stir until the breadcrumbs are fully soaked and it looks like a thick paste. Let it sit for 5 minutes.
- Prep your aromatics: Dice the onion finely and mince the garlic cloves.
- Mix the meatloaf base: To the bowl with the panade, add the ground beef, beaten egg, diced onion, minced garlic, 2 tablespoons Worcestershire sauce, salt, pepper, smoked paprika, and dried thyme. Use your hands to gently mix everything together until just combined. Do not overmix.
- Shape the loaf: Transfer the meat mixture to a 9×5-inch loaf pan. Gently press it into the pan, making sure it’s evenly distributed. Do not pack it down.
- Make the brown sugar glaze: In a small bowl, whisk together the ketchup, brown sugar, apple cider vinegar, 1 teaspoon Worcestershire sauce, and garlic powder until the sugar is mostly dissolved.
- Apply the first layer of glaze: Spoon about half of the glaze over the top of the meatloaf and spread it evenly.
- Bake the meatloaf: Place the loaf pan on a baking sheet and bake for 45 minutes.
- Apply the second layer of glaze: After 45 minutes, spoon the remaining glaze over the meatloaf and spread it evenly.
- Finish baking: Return the meatloaf to the oven and bake for another 15-20 minutes, until the internal temperature reaches 160°F (71°C).
- Rest before slicing: Remove the meatloaf from the oven and let it rest in the pan for 10-15 minutes.
- Slice and serve: After resting, slice the meatloaf into 1-inch thick slices and serve.
Notes
Don’t overmix the meatloaf mixture. Use a meat thermometer to ensure it reaches 160°F. Let the meatloaf rest for 10-15 minutes before slicing. For a gluten-free version, use gluten-free breadcrumbs or crushed pork rinds. For a milder onion flavor, sauté the onion before adding.
Nutrition
- Serving Size: 1 slice (1/8 of loaf
- Calories: 400
- Sugar: 11
- Sodium: 700
- Fat: 24
- Saturated Fat: 9
- Carbohydrates: 20
- Fiber: 1
- Protein: 30
Keywords: meatloaf, brown sugar glaze, classic meatloaf, comfort food, ground beef, dinner recipe


