“You really think this is gonna work?” my friend asked, eyeing the bowl of glossy, thick pudding I was whisking in the kitchen. Honestly, I wasn’t sure either. I’d been fiddling around with banana pudding recipes for weeks, trying to get that silky, creamy texture that’s just right—not too runny, not too dense—and all from scratch, no instant mixes or shortcuts. What started as a weekend experiment, sparked by a sudden craving and a half-forgotten banana bunch on the counter, turned into something I found myself making almost every few days. Yes, I was that obsessed.
There’s something about homemade banana pudding that feels like a hug after a long day. The smell of vanilla and fresh bananas mingling with the smooth custard is a quiet comfort, a little pause in the chaos. And honestly, making it from scratch makes all the difference—you get this luscious, creamy pudding that tastes nothing like the store-bought stuff. It’s richer, fresher, and somehow more honest.
That night, after letting the pudding chill and layering it with crisp vanilla wafers and ripe banana slices, I nervously offered my friend a spoonful. The silence that followed was the kind that only happens when someone’s genuinely surprised by how good something is. “Okay,” she said slowly, “I get it now.” And that’s how this creamy homemade banana pudding recipe stuck with me—because it’s not just dessert, it’s a small moment of joy made by hand, from scratch, in just a few simple steps.
Why You’ll Love This Recipe
After making this creamy homemade banana pudding from scratch multiple times, I can confidently say it’s one of those recipes that feels effortless but delivers big on flavor and texture. It’s been tested in my kitchen with family and friends, and every time it’s a hit. If you’re wondering why this version stands out, here’s what makes it special:
- Quick & Easy: You can whip it up in under 30 minutes, plus chilling time. Perfect for those moments when you want dessert without a ton of fuss.
- Simple Ingredients: No need for fancy or hard-to-find stuff. Most ingredients are pantry staples, which means less stress and more yum.
- Perfect for Any Occasion: Whether you’re hosting a casual get-together or just craving a cozy night in, this banana pudding fits right in.
- Crowd-Pleaser: Kids love it, adults ask for seconds, and it’s always the last dish standing at potlucks.
- Unbelievably Delicious: The blend of creamy pudding, fresh bananas, and crisp vanilla wafers creates that classic southern comfort vibe that’s hard to beat.
What really sets this recipe apart is the homemade custard base. Instead of boxed pudding mixes, you’re making your own smooth, velvety custard infused with real vanilla. Plus, the layering technique lets the flavors meld beautifully, and the vanilla wafers stay just the right amount of tender-crisp. I’ve tried versions where the pudding was overly sweet or thin, but this one balances sweetness and creaminess perfectly—sort of like the quick creamy tuna pasta I make when I want something comforting but fuss-free.
What Ingredients You Will Need
This recipe uses simple, wholesome ingredients to deliver bold flavor and satisfying texture without the fuss. Most of these are pantry staples, and you can easily substitute a few to fit your needs.
- Milk: 2 ½ cups (600 ml) whole milk, for richness. You can use 2% but whole milk gives that creamy texture.
- Granulated Sugar: ¾ cup (150 g) for balanced sweetness.
- Egg Yolks: 3 large, room temperature, which help thicken and add richness to the custard.
- All-Purpose Flour: ¼ cup (30 g) to gently thicken the pudding without making it gummy.
- Vanilla Extract: 2 teaspoons, preferably pure vanilla extract for the best flavor.
- Salt: A pinch to enhance overall taste.
- Ripe Bananas: 3-4 medium, sliced just before layering to keep them fresh and vibrant.
- Vanilla Wafers: About 40 wafers (one 11 oz/312 g package), classic for that perfect crunch and sweetness contrast.
- Heavy Cream: 1 cup (240 ml), cold, whipped to soft peaks for a light, fluffy topping that adds extra creaminess.
For best results, I usually turn to trusted brands like Nielsen-Massey for vanilla extract and fresh bananas that are just starting to get those little brown spots—the ones that taste sweetest and soften perfectly in the pudding. If you want to make this gluten-free, swap the all-purpose flour for cornstarch or a gluten-free blend, and look for gluten-free vanilla wafers.
Equipment Needed
- Medium Saucepan: For cooking the custard. A heavy-bottomed pan helps prevent scorching.
- Whisk: Essential for stirring the custard to keep it smooth and lump-free.
- Mixing Bowls: One for beating egg yolks and another for whipping cream.
- Electric Mixer or Whisk: To whip the heavy cream until soft peaks form.
- Spatula: For folding the whipped cream into the custard gently.
- 9×13-inch Baking Dish or Trifle Bowl: For assembling the pudding layers.
- Fine Mesh Sieve (Optional): To strain the custard for an ultra-smooth finish if desired.
If you don’t have an electric mixer, a sturdy whisk and a bit of elbow grease will do just fine for the whipped cream. I’ve found that using a silicone spatula makes folding easier and helps keep the pudding light and airy. You don’t need anything fancy—just solid basics you probably already own, which makes this recipe even more approachable.
Preparation Method
- Heat the Milk: Pour 2 ½ cups (600 ml) of whole milk into a medium saucepan and place over medium heat. Warm it until it’s just about to simmer—small bubbles will form at the edges, but don’t let it boil. This should take around 5-7 minutes. Stir occasionally to prevent a skin from forming.
- Mix Dry Ingredients and Egg Yolks: While the milk is heating, whisk together ¾ cup (150 g) granulated sugar, ¼ cup (30 g) all-purpose flour, and a pinch of salt in a bowl. In another bowl, beat 3 large egg yolks until smooth. Gradually whisk the dry ingredients into the egg yolks until fully combined.
- Temper the Eggs: Slowly pour about 1 cup (240 ml) of the hot milk into the egg mixture while whisking constantly. This step is crucial to prevent the eggs from scrambling. Once combined, pour this mixture back into the saucepan with the remaining milk.
- Cook the Custard: Return the saucepan to medium heat and cook, stirring constantly with a whisk, until the pudding thickens and coats the back of a spoon. This should take about 5-8 minutes. You’ll notice the texture change from liquid to thick and creamy—that’s your cue. Remove from heat and stir in 2 teaspoons of pure vanilla extract.
- Chill the Custard: Pour the custard into a mixing bowl and cover the surface directly with plastic wrap to prevent a skin from forming. Let it cool to room temperature, then refrigerate for at least 2 hours until fully chilled.
- Prepare the Whipped Cream: In a cold bowl, whip 1 cup (240 ml) heavy cream with an electric mixer or whisk until soft peaks form.
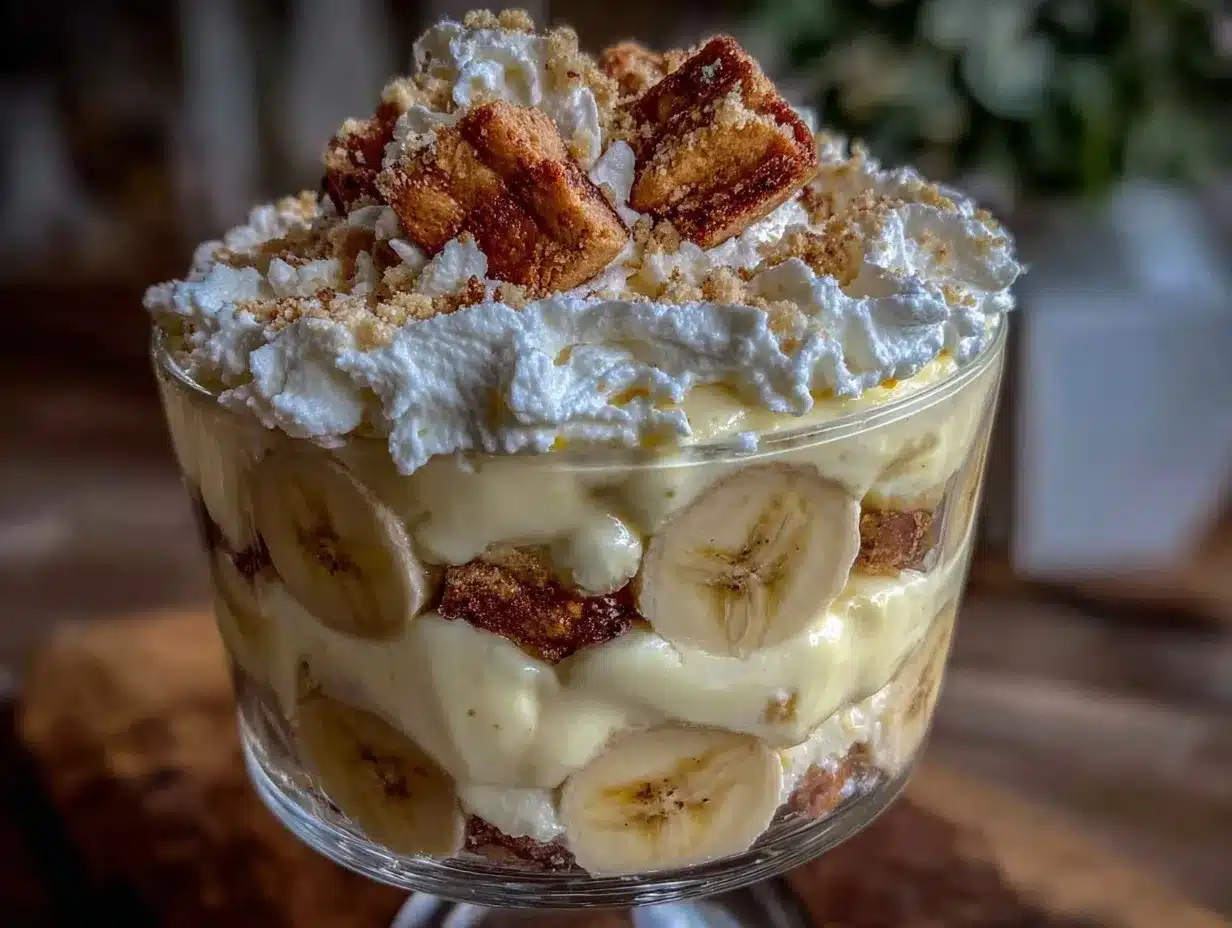
- Fold and Assemble: Gently fold the whipped cream into the chilled custard until combined. In your baking dish or trifle bowl, layer vanilla wafers, banana slices, and pudding mixture. Repeat layers until all ingredients are used, finishing with a pudding layer topped with a few wafers or banana slices for garnish.
- Final Chill: Cover and refrigerate the assembled pudding for at least 4 hours or overnight. This resting time lets the wafers soften slightly while maintaining some crunch, and the flavors meld beautifully.
Pro tip: If your custard starts to get lumpy or thickens too quickly, remove it from heat immediately and whisk vigorously—sometimes a quick off-heat stir smooths it right out. Also, slicing bananas just before layering keeps them from browning too fast, so your pudding looks as good as it tastes.
Cooking Tips & Techniques
Making banana pudding from scratch is truly about patience and attention to detail. Here are a few tips I’ve picked up after a few “oops” moments:
- Constant Stirring Matters: When cooking the custard, don’t wander off. Stirring constantly with a whisk prevents lumps and burning on the bottom.
- Don’t Rush the Tempering: Adding hot milk slowly to the eggs is the trick to avoiding scrambled eggs in your pudding. Slow and steady wins the race here.
- Chill Time Is Key: The pudding tastes best after it’s fully chilled. The texture firms up and flavors settle. If you try to rush it, the pudding can feel loose.
- Whip Cream Just Right: Stop whipping as soon as you get soft peaks; over-whipping turns it grainy and butter-like.
- Layering Order: Start with wafers at the bottom so they soak up some moisture and soften, then bananas, then pudding. This layering keeps textures balanced.
- Personal Experience: I once skipped folding in the whipped cream and stirred it straight in—big no-no. The pudding lost its lightness and felt heavy. So trust the folding method!
A quick side note—if you’re into simple weeknight meals, you might enjoy the easy 15-minute spaghetti aglio olio recipe I shared. It’s about the same level of fuss but perfect when you want a quick savory meal before indulging in something sweet like this pudding.
Variations & Adaptations
This banana pudding recipe is a great canvas to make your own. Here are some variations I’ve tried or thought about:
- Dairy-Free Version: Swap whole milk for coconut milk or almond milk and use coconut cream instead of heavy cream for whipping. The flavor shifts slightly but stays creamy and delicious.
- Chocolate Banana Pudding: Add 2 tablespoons of cocoa powder to the custard mixture while cooking for a chocolate twist. Layer with chocolate wafer cookies instead of vanilla wafers.
- Seasonal Fruit Mix: In warmer months, swap half the bananas with fresh berries or sliced peaches to add a fresh, tangy note.
- Low-Sugar Option: Use a natural sweetener like honey or maple syrup instead of granulated sugar and reduce the amount slightly. Be mindful this may affect the custard’s thickness.
- Personal Twist: I once added a splash of bourbon to the custard for a subtle boozy kick—perfect for adult dinner parties.
For a different texture, try baking the assembled pudding for 15 minutes at 350°F (175°C) until the top is golden brown—almost like a custard pie. It’s a nice change if you want something warm and cozy.
Serving & Storage Suggestions
This creamy homemade banana pudding is best served chilled straight from the fridge. The pudding will be cool, smooth, and the wafers slightly softened but still with a bit of bite. I like to garnish mine with a few extra banana slices or a sprinkle of crushed vanilla wafers for texture contrast.
It pairs beautifully with a cup of strong coffee or a light dessert wine if you’re feeling fancy. For a casual meal, it’s a sweet finish after dishes like zesty lemon chicken, which balances nicely with the pudding’s creamy sweetness.
Store leftovers covered tightly in the refrigerator for up to 3 days. The flavors deepen over time, but the bananas may brown more, so if you want to keep it looking fresh, add a squeeze of lemon juice on the sliced bananas before layering. Avoid freezing this pudding since the texture changes and can become watery when thawed.
Reheat is not recommended since the custard will lose its silky texture. If you want a warm treat, try the baked variation mentioned earlier.
Nutritional Information & Benefits
Per serving (based on 8 servings), this banana pudding contains approximately:
| Calories | 280 |
|---|---|
| Fat | 13g |
| Carbohydrates | 35g |
| Protein | 4g |
| Sugar | 22g |
Key ingredients like bananas provide potassium, vitamin C, and dietary fiber, making this dessert a somewhat nutritious treat compared to processed options. Using whole milk and eggs adds protein and calcium, important for bone health.
This recipe is vegetarian-friendly but contains dairy and eggs, so it’s not suitable for vegans or those with dairy allergies without substitutions. The recipe can be adapted for gluten-free diets by swapping the flour and wafers.
From a wellness perspective, I appreciate that this pudding is homemade—no preservatives or artificial flavors. It’s a sweet treat that feels a little more honest and nourishing than store-bought desserts.
Conclusion
This creamy homemade banana pudding from scratch is a recipe that’s stuck around in my kitchen for all the right reasons. It’s easy enough for a last-minute dessert, feels special enough for guests, and tastes like a little bit of southern comfort in every spoonful.
Feel free to tweak the sweetness, swap ingredients to suit your diet, or add your own flavors. What matters is that it brings a smile and a pause to savor something homemade and creamy. If you’ve ever been hesitant to make pudding from scratch, this recipe shows it’s really not as intimidating as it seems.
Next time you’re in the mood for a cozy, sweet finish, give this a try—and I’d love to hear how you make it your own!
FAQs About Creamy Homemade Banana Pudding
Can I make banana pudding ahead of time?
Yes, in fact, it tastes better after chilling for several hours or overnight as the flavors meld and wafers soften just right.
What’s the best way to keep banana slices from browning?
Coat the banana slices lightly with lemon juice before layering to slow oxidation and keep them looking fresh.
Can I use instant pudding mix instead of making custard from scratch?
You can, but the homemade custard has a fresher, richer flavor and smooth texture that instant mixes can’t match.
Is there a dairy-free version of this recipe?
Yes, swap milk for almond or coconut milk and use coconut cream whipped for the topping. Use gluten-free wafers if needed.
How long does banana pudding last in the fridge?
It’s best eaten within 3 days. Beyond that, the bananas may brown and texture may change.
Pin This Recipe!
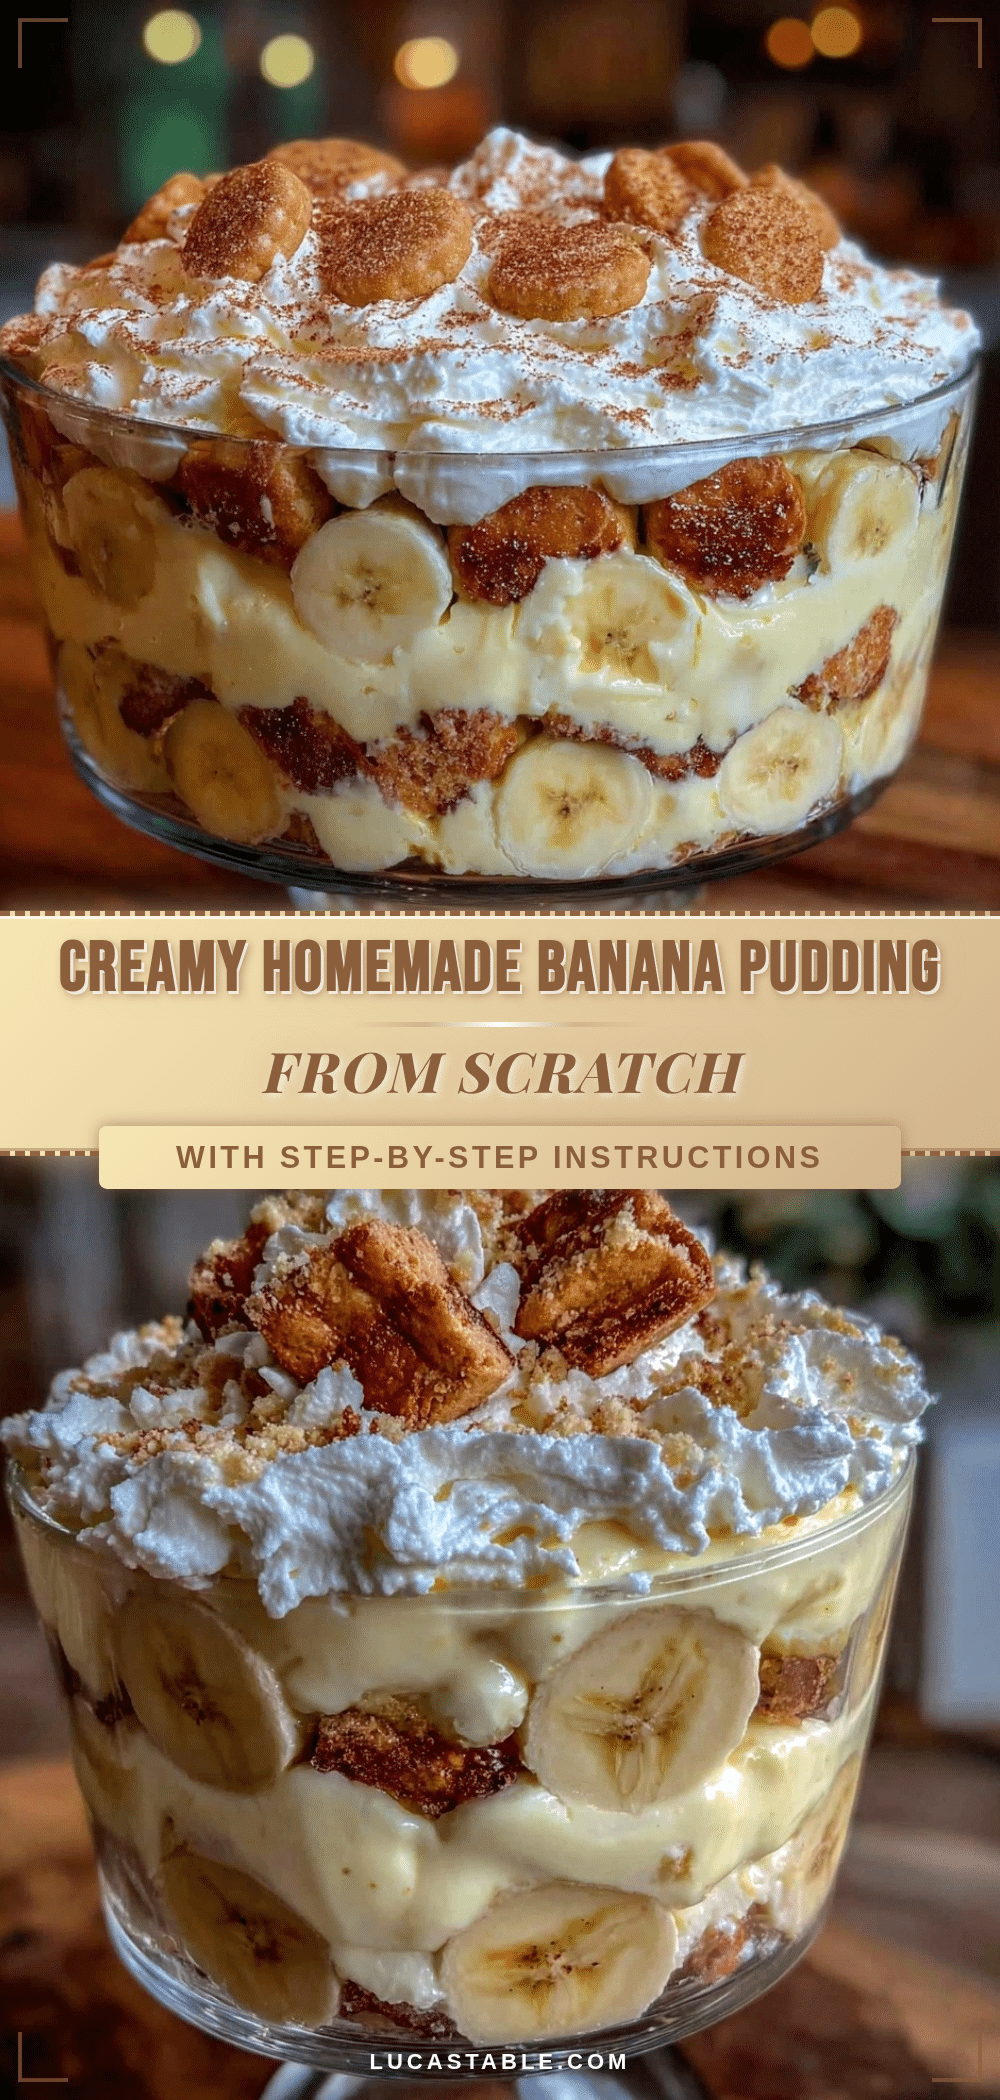
Creamy Homemade Banana Pudding Recipe Easy from Scratch in 5 Steps

A rich and creamy banana pudding made from scratch with a smooth custard base, fresh bananas, and crisp vanilla wafers. This easy recipe delivers classic southern comfort in just a few simple steps.
- Prep Time: 15 minutes
- Cook Time: 15 minutes
- Total Time: 6 hours 30 minutes
- Yield: 8 servings 1x
- Category: Dessert
- Cuisine: Southern American
Ingredients
- 2 ½ cups (600 ml) whole milk
- ¾ cup (150 g) granulated sugar
- 3 large egg yolks, room temperature
- ¼ cup (30 g) all-purpose flour
- 2 teaspoons pure vanilla extract
- A pinch of salt
- 3–4 medium ripe bananas, sliced just before layering
- About 40 vanilla wafers (one 11 oz/312 g package)
- 1 cup (240 ml) heavy cream, cold, whipped to soft peaks
Instructions
- Heat the milk in a medium saucepan over medium heat until just about to simmer, about 5-7 minutes, stirring occasionally.
- Whisk together sugar, flour, and salt in a bowl. In another bowl, beat egg yolks until smooth. Gradually whisk dry ingredients into egg yolks until combined.
- Slowly pour about 1 cup of hot milk into the egg mixture while whisking constantly to temper the eggs. Pour mixture back into saucepan with remaining milk.
- Cook custard over medium heat, stirring constantly, until thickened and coats the back of a spoon, about 5-8 minutes. Remove from heat and stir in vanilla extract.
- Pour custard into a bowl, cover surface with plastic wrap to prevent skin, cool to room temperature, then refrigerate at least 2 hours until chilled.
- Whip heavy cream in a cold bowl until soft peaks form.
- Gently fold whipped cream into chilled custard until combined. In a baking dish or trifle bowl, layer vanilla wafers, banana slices, and pudding mixture. Repeat layers, finishing with pudding topped with wafers or banana slices.
- Cover and refrigerate assembled pudding for at least 4 hours or overnight before serving.
Notes
Constant stirring prevents lumps and burning. Temper eggs slowly to avoid scrambling. Chill pudding fully for best texture. Whip cream to soft peaks only. Slice bananas just before layering to prevent browning. For gluten-free, substitute flour and wafers accordingly. For dairy-free, use almond or coconut milk and coconut cream.
Nutrition
- Serving Size: 1/8 of the pudding
- Calories: 280
- Sugar: 22
- Fat: 13
- Carbohydrates: 35
- Protein: 4
Keywords: banana pudding, homemade banana pudding, creamy banana pudding, southern dessert, vanilla wafers, custard pudding, easy banana dessert