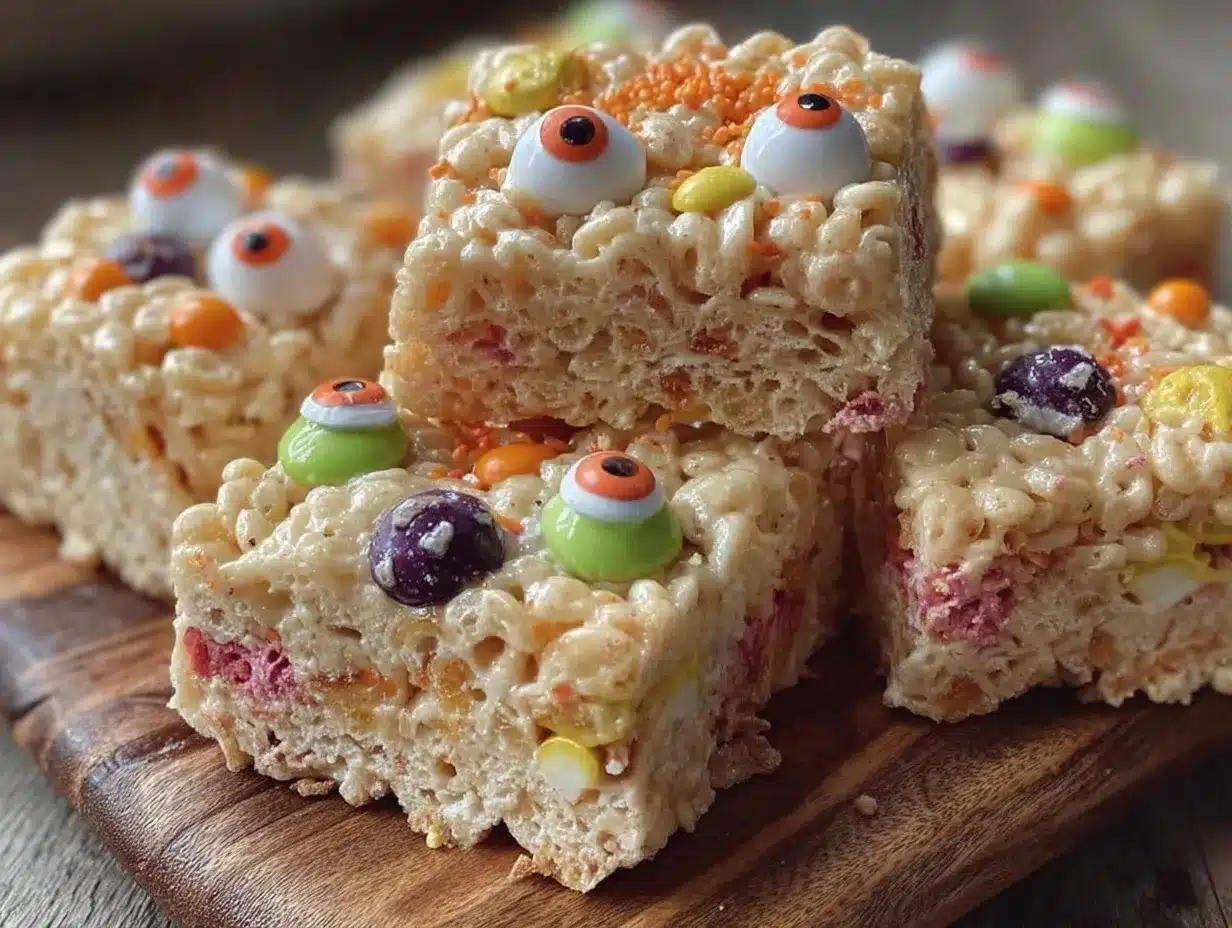
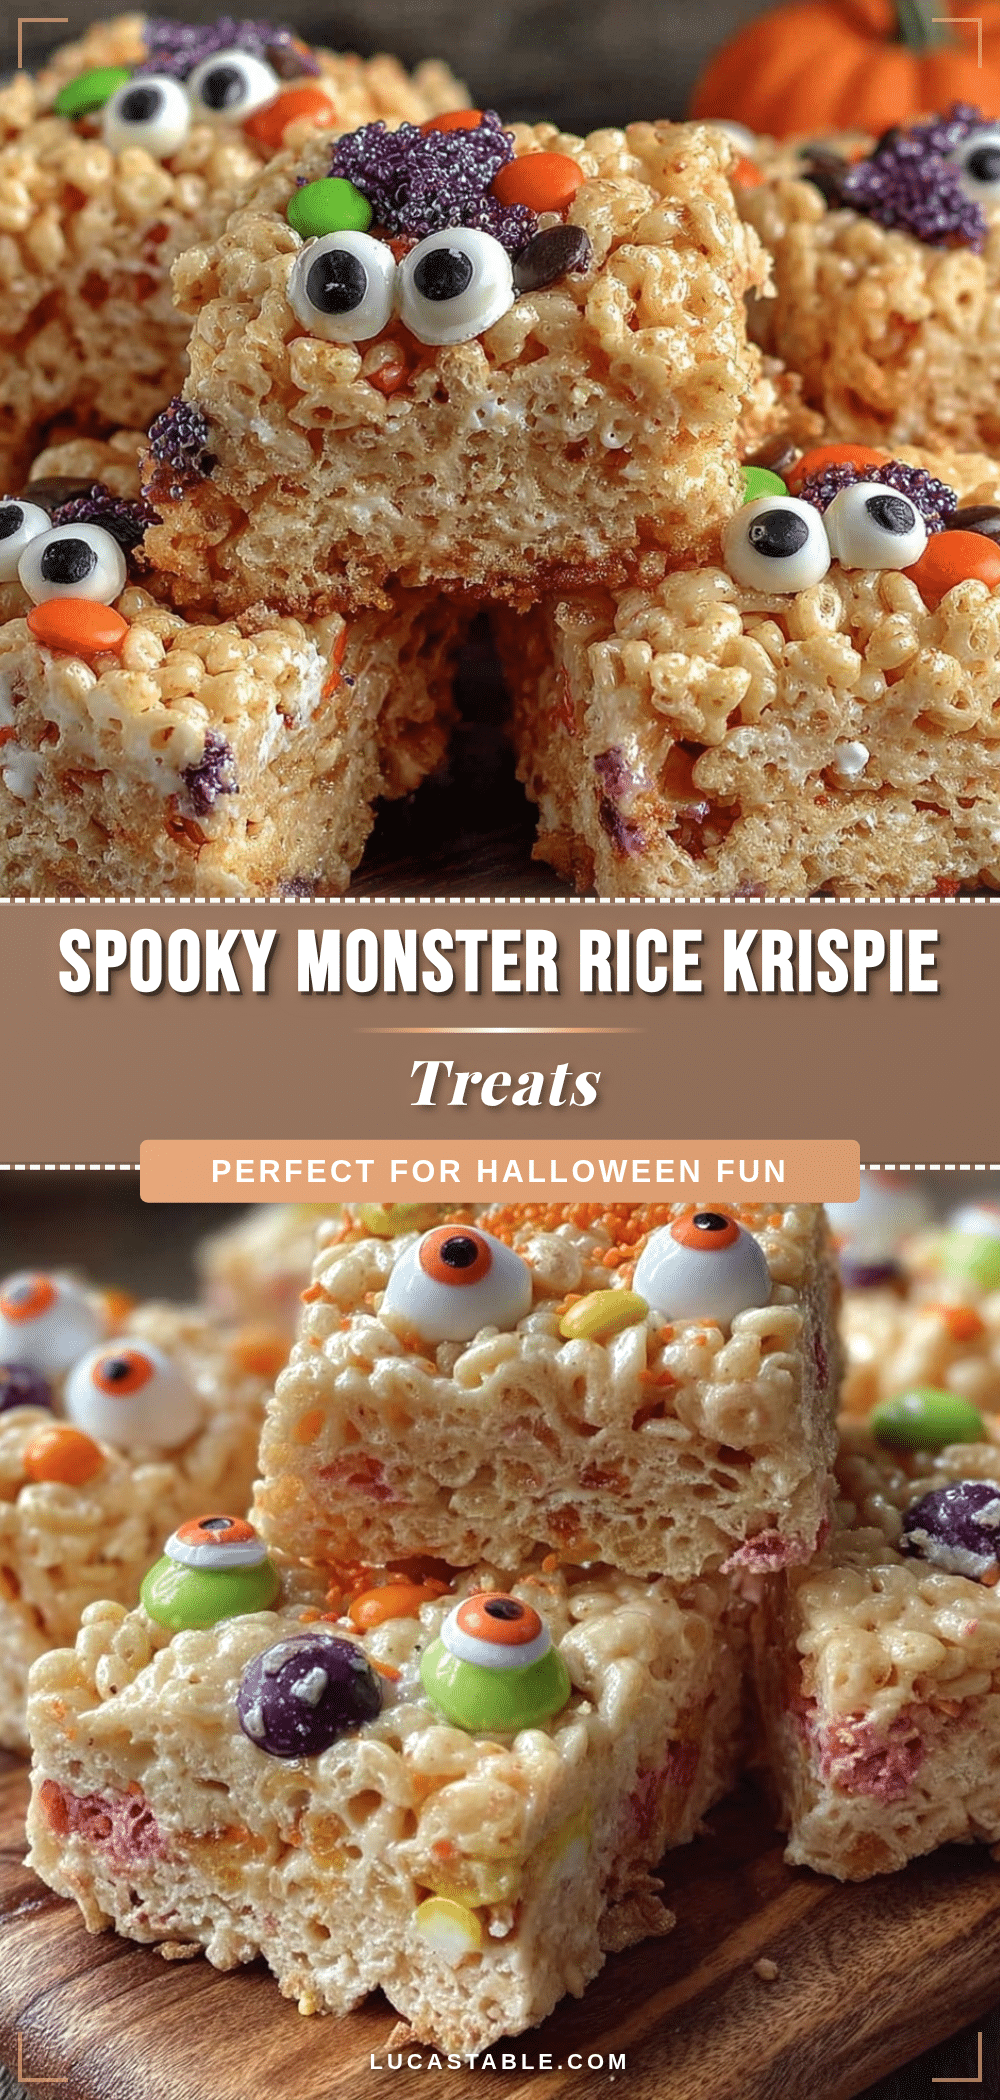
“Hey, are you bringing those monster treats again?” That’s the question my neighbor’s kids asked every Halloween after I first whipped up these fun monster Rice Krispie treats. Honestly, I didn’t mean to make anything so memorable. It sort of happened on accident during a hectic October afternoon when I was juggling last-minute costume prep and a mountain of candy to sort. I wanted something quick, a little spooky, and, well, kid-friendly, but wasn’t sure if it’d actually turn out cute instead of just sticky and messy.
But as I stirred the marshmallows into the crispy rice cereal, a thought struck me — why not add some wild colors and goofy eyeballs to make them look like silly monsters? I found some leftover candy eyes from last year and tossed in a few neon sprinkles. The result? These goofy little monsters that were both fun to make and impossible not to smile at. The best part? Everyone gobbled them up, asking for more before they even got to the candy bowl.
Now, these Fun Monster Rice Krispie Treats are a staple every October in our house. They’re perfect for Halloween celebrations where you want something festive, easy, and a little bit goofy. Plus, they’re a great way to get the kids involved without any mess that’s hard to clean up (believe me, I’ve learned that the hard way!). It’s funny how a quick fix can turn into a beloved tradition — these treats bring a little joy and a lot of laughter, making the spooky season just a bit sweeter.
It’s that simple magic of childhood nostalgia mixed with a dash of silliness that makes these treats stick around in my heart. If you’re looking for a Halloween recipe that’s more about smiles than scares, you might find yourself reaching for this one year after year — just like I do.
Why You’ll Love This Recipe
Trust me, making these Fun Monster Rice Krispie Treats isn’t just about the final product; it’s the entire experience that wins you over. I’ve made these dozens of times for all sorts of gatherings, and here’s why they always score big:
- Quick & Easy: You can have these ready in under 30 minutes. Perfect for those last-minute Halloween party ideas when time’s tight and the doorbell is ringing.
- Simple Ingredients: No specialty stores needed. You probably already have marshmallows, rice cereal, and butter sitting in your pantry.
- Perfect for Halloween Parties: These treats bring whimsical fun to any spooky spread, whether it’s a school party, neighborhood gathering, or family night.
- Crowd-Pleaser: Kids love them for the goofy monster faces, and adults appreciate the nostalgic crunch and sweetness.
- Unbelievably Delicious: That perfect combination of gooey marshmallow with crispy cereal is like a warm hug — comforting, sweet, and just the right texture.
This isn’t your typical Rice Krispie treat. The twist comes from adding fun candy eyes and colorful sprinkles that give each monster a unique personality. Plus, I blend the marshmallows and butter gently so the treats are soft yet hold their shape — no crumbly mess here! Honestly, it’s the kind of recipe that makes you close your eyes after the first bite and smile quietly to yourself. It’s comfort food reimagined with a playful Halloween spirit.
Whether you want to impress guests with minimal effort or just create a fun activity with the kids, these treats are a no-fail winner. If you love quick and festive recipes like this, you might also enjoy the BBQ chicken pizza I made recently — another favorite for easy gatherings.
What Ingredients You Will Need
This recipe uses simple, wholesome ingredients to deliver bold flavor and that satisfying texture without any fuss. Most are pantry staples, and the fun part is picking out your favorite monster “decorations.”
- Rice Cereal: 6 cups (about 150g) of crispy rice cereal. I prefer a brand like Kellogg’s Rice Krispies for that perfect crunch.
- Marshmallows: 4 cups (about 200g) of mini marshmallows or 10 oz (280g) of large marshmallows, roughly chopped. Use fresh marshmallows for the best gooey texture.
- Unsalted Butter: 3 tablespoons (45g), softened. Butter adds richness and helps bind everything.
- Food Coloring: A few drops of green, purple, or orange gel food coloring to create monster hues. Gel color works best for vibrant shades without watering down the mix.
- Candy Eyes: 1 package (about 30 pieces) of candy eyeballs. These can be found at baking aisles or online — they add instant personality!
- Sprinkles & Decorations: Assorted Halloween-themed sprinkles like orange, black, and neon green jimmies or sugar crystals to make your monsters stand out.
- Vanilla Extract: 1 teaspoon for a subtle flavor boost.
If you want to tweak the recipe for dietary needs, almond or coconut flour can replace some cereal for a lower-carb version, and dairy-free butter and marshmallows are great substitutes for vegans. I once tried swapping the candy eyes with mini chocolate chips for a different texture — it worked surprisingly well!
Equipment Needed
- Large Microwave-Safe Bowl or Pot: For melting marshmallows and butter. I usually use a heavy-bottomed saucepan to avoid scorching.
- Wooden Spoon or Silicone Spatula: For stirring the marshmallow mixture smoothly.
- 9×13-inch Baking Pan: To press and shape the treats. I line mine with parchment paper for easy removal.
- Measuring Cups and Spoons: Accurate measurements ensure consistent results.
- Optional: Candy tweezers or small tongs for placing eyeballs and sprinkles precisely — trust me, it helps when little hands get involved!
For budget-friendly options, a microwave-safe glass bowl works well instead of a pot. Just be sure to stir often when microwaving so the marshmallows don’t burn. Silicone spatulas are my go-to because they scrape the bowl clean without scratching surfaces.
Preparation Method
- Prepare your pan: Lightly grease a 9×13-inch baking pan or line it with parchment paper. This step makes removing the treats so much easier later. (5 minutes)
- Melt the butter: In a large microwave-safe bowl or over low heat on the stove, melt 3 tablespoons (45g) of unsalted butter until just melted. Avoid browning. (2-3 minutes)
- Add marshmallows: Stir in 4 cups (200g) mini marshmallows or 10 oz (280g) chopped large marshmallows. Heat in 30-second intervals, stirring in between, until the mixture is smooth and fully melted. (5-6 minutes total)
- Mix in vanilla and food coloring: Add 1 teaspoon vanilla extract and a few drops of your chosen gel food coloring. Stir gently until the color is evenly distributed. (1 minute)
- Add rice cereal: Pour in 6 cups (150g) of rice cereal. Fold the cereal carefully into the marshmallow mixture using a spatula or wooden spoon. The goal is to coat every grain without smashing the cereal too much. (3-4 minutes)
- Press into pan: Transfer the mixture to your prepared pan. Use a buttered spatula or wax paper to press it evenly to the edges. Don’t press too hard or the treats will become dense instead of light and crispy. (5 minutes)
- Add monster faces: While still warm, press candy eyeballs and sprinkles into the surface to create silly monster faces. Work quickly before the marshmallows start to set. (5-10 minutes)
- Cool completely: Let the treats sit at room temperature for at least 30 minutes to firm up. Then, slice into squares or fun shapes with a sharp knife. (30 minutes)
Pro tip: If your marshmallow mixture feels too stiff, a quick zap in the microwave for 15 seconds will soften it right up. Also, don’t skip the parchment paper — it saves you from scraping sticky messes later! When shaping, I like to wear gloves lightly coated with butter to keep everything neat.
Cooking Tips & Techniques
Making Rice Krispie treats sounds simple, but a few tricks can really make your Fun Monster Rice Krispie Treats stand out. For one, melting marshmallows slowly and stirring frequently prevents burning and gives you that perfect silky texture. I learned the hard way that rushing this step can leave you with clumpy bits that ruin the smoothness.
Another tip is to use gel food coloring rather than liquid. Liquid can thin out the marshmallow mixture, making it harder to hold shape. Gel colors pack a punch and keep your treats vibrant. When pressing the mixture into the pan, don’t use your hands directly — they get sticky fast! A buttered spatula or wax paper helps keep the surface smooth without sticking.
Placing candy eyes and sprinkles should be your last step before the treats set. If you wait too long, the marshmallows harden and decorations won’t stick well. I also recommend working swiftly but gently — too much pressure can flatten the crispy texture.
For multitasking, while the treats cool, you can prep other Halloween snacks like a quick crispy chicken fried rice or whip up an easy spaghetti aglio olio for dinner. This way, you keep the festive vibe rolling without wasting any time.
Variations & Adaptations
- Spooky Colors: Swap in different gel colors for a rainbow of monster creatures. Purple and lime green are kid favorites, but you can try neon pink or electric blue for an unexpected twist.
- Nut-Free Version: Use sunflower seed butter instead of butter if allergies are a concern. Also, check marshmallow ingredients carefully as some brands contain gelatin.
- Chocolate Monster Treats: Stir in 1/2 cup (90g) mini chocolate chips with the cereal for a chocolatey crunch. You can even drizzle melted dark chocolate on top after setting for extra flair.
- Gluten-Free Option: Confirm your rice cereal is gluten-free (many are, but not all). Gluten-free marshmallows and butter make this safe for those with sensitivities.
- Personal Favorite: Once, I added crushed peppermint candies for a minty surprise that was a hit at a Halloween potluck. It’s a fun way to mix it up if you want a seasonal flavor.
Serving & Storage Suggestions
These Fun Monster Rice Krispie Treats are best served at room temperature. They’re perfect finger foods for parties, easy to grab and munch while mingling. For a fun presentation, arrange them on a platter with a mix of monster faces or stack them in a spooky tower with little signs to name each monster.
Complement these treats with a tall glass of cold milk or a warm cup of spiced apple cider for a cozy, seasonal combo. If you’re planning a bigger Halloween spread, they pair well alongside savory dishes like quick zesty lemon chicken to balance sweet and savory flavors.
To store, place leftover treats in an airtight container at room temperature for up to 3 days. For longer storage, wrap them tightly in plastic wrap and freeze for up to a month. When ready, thaw at room temperature — the texture will still be delightfully chewy. Reheating is usually unnecessary but if you want to soften them a bit, a quick 10-second zap in the microwave works wonders.
Over time, the flavors meld nicely, and the treats get just a little softer, making them perfect for enjoying over a few days during your Halloween festivities.
Nutritional Information & Benefits
Each serving (one treat square) contains approximately 150-180 calories, mostly from carbohydrates and sugars due to marshmallows and cereal. These treats are a fun occasional sweet rather than everyday fuel, but they do bring some simple joys with minimal ingredients.
The key ingredients—rice cereal and marshmallows—are gluten-free by nature (verify packaging), making this treat accessible for many with gluten sensitivities. Butter adds a touch of fat for richness but can be swapped for dairy-free alternatives if needed.
While this isn’t a health food, it can be part of balanced seasonal fun, especially when paired with fruit or a protein-rich meal. Personally, I see these treats as a sweet way to celebrate with family and friends without fuss or complicated prep.
Conclusion
These Fun Monster Rice Krispie Treats have become a Halloween tradition I can’t imagine skipping. They’re easy, playful, and bring a smile that’s hard to beat. The best part? You can make them your own — add your favorite colors, decorations, or mix-ins to suit your crew’s tastes.
Every year, I look forward to the moment when the kids’ faces light up spotting the goofy eyes and wild sprinkles. It’s a simple recipe that brings a little magic to the season, and I’m sure you’ll find it just as rewarding.
Give it a try this Halloween and see what kind of monsters you create! I’d love to hear how you customize the recipe or what your favorite spooky treats are — feel free to share your stories and tips below.
Happy haunting and happy baking!
FAQs about Fun Monster Rice Krispie Treats
Can I make these treats ahead of time?
Yes! You can prepare them a day or two in advance. Just store them in an airtight container at room temperature to keep them fresh and chewy.
What can I use if I don’t have candy eyes?
Mini chocolate chips, jelly beans, or even colored icing dots can work well. Get creative with what you have on hand!
How do I keep the treats from sticking to my hands?
Lightly butter your hands or use a spatula to press the mixture into the pan. This helps avoid sticky fingers and keeps the treats looking neat.
Are these treats gluten-free?
They can be, if you use gluten-free rice cereal and check that marshmallows are gluten-free. Always verify the packaging just to be sure.
Can I add flavors like chocolate or peanut butter?
Absolutely! Stir in mini chocolate chips or swirl melted peanut butter into the marshmallow mixture before adding the cereal for a tasty twist.
Pin This Recipe!
Fun Monster Rice Krispie Treats Easy Halloween Party Recipe Ideas
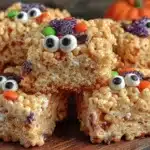
These fun monster Rice Krispie treats are quick, easy, and perfect for Halloween parties. They feature colorful marshmallow mixtures with candy eyes and sprinkles to create silly monster faces that kids and adults love.
- Prep Time: 10 minutes
- Cook Time: 15 minutes
- Total Time: 55 minutes
- Yield: 24 servings 1x
- Category: Dessert
- Cuisine: American
Ingredients
- 6 cups (about 150g) crispy rice cereal (e.g., Kellogg’s Rice Krispies)
- 4 cups (about 200g) mini marshmallows or 10 oz (280g) large marshmallows, roughly chopped
- 3 tablespoons (45g) unsalted butter, softened
- A few drops of green, purple, or orange gel food coloring
- 1 package (about 30 pieces) candy eyeballs
- Assorted Halloween-themed sprinkles (orange, black, neon green jimmies or sugar crystals)
- 1 teaspoon vanilla extract
Instructions
- Lightly grease a 9×13-inch baking pan or line it with parchment paper. (5 minutes)
- Melt 3 tablespoons (45g) unsalted butter in a large microwave-safe bowl or over low heat on the stove until just melted. Avoid browning. (2-3 minutes)
- Stir in 4 cups (200g) mini marshmallows or 10 oz (280g) chopped large marshmallows. Heat in 30-second intervals, stirring in between, until smooth and fully melted. (5-6 minutes total)
- Add 1 teaspoon vanilla extract and a few drops of gel food coloring. Stir gently until color is evenly distributed. (1 minute)
- Pour in 6 cups (150g) rice cereal. Fold the cereal carefully into the marshmallow mixture using a spatula or wooden spoon to coat every grain without smashing. (3-4 minutes)
- Transfer mixture to prepared pan. Use a buttered spatula or wax paper to press evenly to edges without pressing too hard. (5 minutes)
- While still warm, press candy eyeballs and sprinkles into the surface to create silly monster faces. Work quickly before marshmallows set. (5-10 minutes)
- Let treats sit at room temperature for at least 30 minutes to firm up. Slice into squares or fun shapes with a sharp knife. (30 minutes)
Notes
Use gel food coloring for vibrant colors without thinning the marshmallow mixture. Press candy eyes and sprinkles while mixture is still warm for best adhesion. If mixture stiffens, microwave for 15 seconds to soften. Use parchment paper for easy removal. Lightly butter hands or spatula to avoid stickiness when pressing mixture.
Nutrition
- Serving Size: One treat square
- Calories: 165
- Sugar: 20
- Sodium: 90
- Fat: 4
- Saturated Fat: 2.5
- Carbohydrates: 31
- Protein: 1
Keywords: Halloween treats, Rice Krispie treats, monster treats, kid-friendly dessert, easy Halloween recipe, candy eyes, spooky snacks