Adorable Black Cat Halloween Sugar Cookies: Easy Recipe
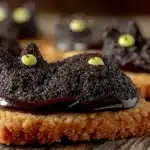
These black cat Halloween sugar cookies are soft in the center, slightly crisp at the edges, and use black cocoa powder for a deep, dark color without artificial food coloring. They’re the perfect spooky treat for fall gatherings.
- Prep Time: 1 hour 45 minutes
- Cook Time: 10 minutes
- Total Time: 2 hours 55 minutes
- Yield: 24 servings 1x
- Category: Dessert
- Cuisine: American
Ingredients
Scale
- 2 ¾ cups (345g) all-purpose flour
- ½ cup (40g) black cocoa powder
- 1 teaspoon baking powder
- ½ teaspoon salt
- 1 cup (226g) unsalted butter, softened
- 1 cup (200g) granulated sugar
- 1 large egg, room temperature
- 1 teaspoon vanilla extract
- 3 cups (360g) powdered sugar
- 2 tablespoons meringue powder
- 4–5 tablespoons warm water
- Orange gel food coloring
- Black decorating gel or edible marker
Instructions
- Make the Dough (15 minutes): In a medium bowl, whisk together the flour, black cocoa powder, baking powder, and salt. Set aside. In the bowl of your stand mixer fitted with the paddle attachment, beat the softened butter and granulated sugar on medium speed until light and fluffy, about 3-4 minutes. Scrape down the sides of the bowl. Add the egg and vanilla extract, and beat until combined. Don’t overmix here.
- Combine Wet and Dry: With the mixer on low, gradually add the flour mixture to the butter mixture. Mix until just combined. The dough will look crumbly at first, but it will come together. If it’s too dry, add a teaspoon of cold water.
- Chill the Dough (1-2 hours): Divide the dough in half. Flatten each half into a disc about 1-inch thick. Wrap tightly in plastic wrap and refrigerate for at least 1 hour, or up to 2 days. This step is crucial. Chilling the dough relaxes the gluten and solidifies the butter, which prevents the cookies from spreading in the oven.
- Roll and Cut (20 minutes): Preheat your oven to 350°F (175°C). Line your baking sheets with parchment paper. On a lightly floured surface, roll out one disc of dough to about ¼-inch thickness. Use your cat-shaped cookie cutter to cut out the cookies. Gently transfer them to the prepared baking sheets, spacing them about 1 inch apart. Gather the scraps, re-roll, and cut again. Repeat with the second disc.
- Chill Again (15 minutes): Place the baking sheets with the cut-out cookies in the refrigerator for 15 minutes. I know it seems like overkill, but this second chill is what keeps those adorable cat ears from melting away. Your cookies will look exactly as you cut them.
- Bake (8-10 minutes): Bake the chilled cookies for 8-10 minutes. The edges should be set, and the tops should look dry. They will not brown much due to the black cocoa. Let them cool on the baking sheet for 5 minutes, then transfer them to a wire rack to cool completely before decorating.
- Make the Royal Icing (10 minutes): While the cookies cool, make the icing. In a medium bowl, whisk together the powdered sugar and meringue powder. Add 4 tablespoons of warm water and whisk until smooth. The icing should be thick but flow slightly. Add the remaining water if needed. Stir in the orange gel food coloring until you reach your desired shade. Transfer the icing to a piping bag fitted with a small round tip.
- Decorate the Cookies (30 minutes): Once the cookies are completely cool, pipe an outline around the edge of each cookie. Then, fill the center with more icing, using a toothpick to spread it into the corners. Let the icing set for at least 1 hour. Once dry, use the black decorating gel or an edible marker to draw on the cat’s eyes, nose, and whiskers. You can also pipe a small bow or collar if you’re feeling fancy.
Notes
Chilling the dough twice is crucial for maintaining shape. For best results, use black cocoa powder for the darkest color. Royal icing should have a 15-second consistency. Let the base icing dry completely before adding facial features.
Nutrition
- Serving Size: 1 cookie
- Calories: 185
- Sugar: 16
- Sodium: 95
- Fat: 9
- Saturated Fat: 5
- Carbohydrates: 26
- Fiber: 1
- Protein: 2
Keywords: black cat cookies, Halloween sugar cookies, black cocoa cookies, cut-out cookies, royal icing cookies, spooky cookies, easy Halloween recipe